Total Pageviews

Thursday, December 24, 2009

Happy New Year’s Card

I’ve collected a variety of decorative letters from clipartETC.com and arranged them on a jpeg file that you can print and hand color for a quick but fancy Happy New Year sign.
1. Click on the image above to download my prepared jpeg file. Print on a sheet of heavy 8.5" x 11" paper with the landscape setting and all footers removed.
2. Use ultra fine point markers or pencils to fill in the letters and surrounding shapes.

Read more »

Wednesday, December 23, 2009

Kandinsky Circles Mural

Wassily Kandinsky, a Russian artist from the late 1800s, was inspired by the loose painting style of the Impressionists and ended up pioneering the abstract art movement. This mural is a copy of one of his most popular paintings, and can easily be adapted for larger or smaller classrooms.
This mural contains 12 pages and measures 35"x 23" when complete. For larger classrooms, just print extra pages and add another row. You can purchase my pdf file with instructions for just $5. Click the “Add to Cart” button below to make your payment and receive download instructions.
Add to Cart
Read more »

Sunday, December 20, 2009

Pop Art Wreath Mural

This wreath mural is full of simple graphic shapes, and just the right size to fit on any standard door. I've included 3 versions: square, with and without background patterns and circlular. (Click on image to see examples.)
Each wreath mural has nine pages and measures 23"x 23" when complete. You can purchase my pdf file with instructions for just $5. Click the “Add to Cart” button below to make your payment and receive download instructions.
Add to Cart
Read more »

Saturday, December 19, 2009

Tissue Paper Poinsettias

Tearing shapes from tissue paper can create some very organic shapes, and end up looking pretty similar to poinsettia leaves.
1. Give each student some rectangles of red, green and yellow tissue paper (the craft kind, NOT any that says ‘bleeding paper‘). Show them that there is a grain to the paper which makes it easier to tear in one direction than the other. They are to tear petals, leaves and a center for 3 flowers.
2. After all the shapes are torn, give each student a brush and 50/50 water+glue solution. They need to cover a white sheet of paper with the glue, and then arrange their flowers on top of it. When complete, another layer of the glue goes over the entire paper to seal the shapes down to the paper. Let dry for a few hours.
3. With an oil pastel, color around all of the torn shapes, leaving a bit of white edge around the tissue for a more dramatic effect. I like the Portfolio pastels for this because they are so smooth to color with, and make a nice contrast to the bumpy leaves.
Read more »

Friday, December 18, 2009

Paper Mache Piggy Bank

This was my third after-school paper mache project this year, and I must say that I learned a LOT from doing this with 20 students, mostly grades kinder and 1st. These pigs took 5 class sessions to complete.
1. The first class was just about having each student cover a 12" balloon with a couple of layers of newspaper and paper mache. My favorite recipe is posted here. One thing I learned was to tie the balloon really tight, as it was best if it stayed inflated through the 2nd class. Students that had only one layer of newspaper in the first class (and popped balloons) had shapes that collapsed in the second.
2. The students covered their balloons with a second layer of newspaper. In hindsight, I would have asked them to place their strips in a different direction so that they could see their progress more easily.
3. To smooth out the body and cover up the darkness of the newspaper, the students covered their ballon with a layer of mache covered paper towel strips.
4. To prep the pigs for the students, I used small white styrofoam cups (the 2" tall type from Smart & Final) and glued them with Tacky glue to the bottom for feet, and over the knot of the balloon for the snout. A curved section of the cups was also cut and glued for the ears. This was done a day before class to make sure the glue would dry. During class, time the students made one more paper towel mache covering, making sure they covered the ears, nose and feet of their pig.
5. At last, paint day! I limited the students to one acrylic color (pink) for budget reasons, but let them add any decorations they wished. After the paint dried, I cut the coin slots with a razor knife and sprayed the entire pig with a shiny varnish.
Read more »

Thursday, December 17, 2009

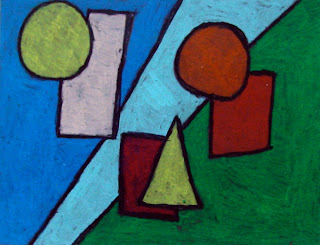
Abstract Shape Drawing

I’m finding that almost anything looks good when drawn on black paper, and colored heavily with oil pastels. This is more of an exercise, but can look like a cool abstract drawing when complete.
1. Give each student a sheet of black construction paper, and ask them to draw one circle, one square and one triangle, with space in between. They may fill the page with more of these shapes, with some of them overlapping. When the page is filled, they need to decide which of the overlapping shapes are in front, and erase all the lines that are inside it. Lastly, they add at least two lines that divide up the background. The lines may “jump” over any objects in front.
2. When the pencil drawing is complete, all the lines are traced with a black pastel.
3. All the enclosed shapes are filled in with pastel, along with all the background areas.
Read more »

Tuesday, December 15, 2009

Ceramic Snowman

Sometimes the simplest of projects can turn out to be anything but. My students loved making these snowman, but they did turn out to be a challenge in making clay pieces connect to each other. Whether it was a nose or hat or head, we all learned a lot about what it takes to keep clay shapes from falling apart.
1. The students got a handful of clay, warmed and softened it up with water and formed the small, medium and large balls of their snowman. To connect the shapes, they needed to score (scratch with a fork) the sides of the balls that would touch each other. After securely pressing the scored edges to each other, they could add decorations as desired: carrot noses, buttons, hats, etc. What turned out to be key in making connections was having very soft and damp clay, very defined scratches, and literally “screwing” the shapes into each other. Clay shrinks as it dries so smooth edges just seem to pop apart. Pipe cleaners were stuck into the sides for temporary arms.
2. After drying for several days in the sun, the pipe cleaner arms were removed and the clay was fired in a kiln.
3. The pipe cleaners were placed back in the arm holes, and the students painted the snowman with glaze.
4. The pipe cleaners were removed, and the snowmen were fired for the last time. When cooled, small twigs were placed in the arm holes.
Read more »

Monday, December 14, 2009

Pastel Penguin

Penguins are a very popular subject matter. Looking at some large photos before beginning will give students a chance to see colors and detail they may not have noticed before.
1. I first gave the students oval cardboard templates about 5" tall by 3" wide to trace the body on colored construction paper. They then drew the head, wings and feet. Circle eyes and a triangle beak completed the face. A horizon line was added to the background along with sky details.
2. The students then outlined their drawings with a thin black marker and colored in the shapes with oil pastel. Because this image has so much white, it's fun to do on almost any colored paper so that the white can be colored in.

CA Visual Art Standard: Creative Expression, Grade Kindergarten
2.6 Use geometric shapes/forms (circle, triangle, square) in a work of art.
Read more »

Tuesday, December 8, 2009

Homemade Holiday Gift Box

I admit I get an urge to make more crafty things this time of year. But when I am looking for a good gift project, I tend to end up more in that camp. But hey, it’s all creative, which is the bottom line for me.
1. I found a box pattern online that I adapted to fill a standard letter paper. You can download my template here. I recommend that you copy it on at least cover, if not card stock paper.
2. After cutting out the top and bottom, it really helps to score the fold lines. This can be done by taking a ruler and semi-sharp edge like that of a butter knife, and running it several times over each fold line. Try to make a ridge, but not any tears.
3. After all 8 dashed lines have been scored, make the 4 cuts on the solid black lines. Fold on all the dashed lines in towards the middle of the box. See diagram for illustration on how the ends need to stand up like “C” shaped walls, and then the long sides go up and over, and then get tucked inside. These edges may be glued in place once you see that they fit.
4. The sleeve is easy as you just need to score 4 lines, and then wrap around the box bottom, overlap one side, and glue or tape in place. Once you see where the fold lines occur, the sleeve sides can all be colored in and decorated. Now you just have to decide what special goody to put in your homemade match box!
Read more »

Sunday, December 6, 2009

Warhol Style Christmas Tree Mural

 Andy Warhol (1923-1987) was one of the 20th century’s most creative artists who defined a decade with his groundbreaking Pop Art. His commercial art background must have influenced him when he created this Christmas Tree print in 1958.
Note: I love a new coloring product that I discovered and used on my sample, Crayola Twistable Slick Stix. I like the set of twelve which include a pretty gold and silver, and are super smooth to color with. They are much cleaner to work with than regular oil pastels and seem to leave little to no residue on the paper.

My mural has 24 pages measures 37" by 50" when complete. You can purchase my pdf file with instructions for just $5. Click the “Add to Cart” button below to make your payment and receive download instructions.

Add to Cart
Read more »

Thursday, December 3, 2009

Nutcracker Painting

One way to have students draw LARGE is to instruct them that their art must touch the top and the bottom of a piece of paper.
1. This project requires 10" x 18" paper, tempera paints, black sharpie marker and a gold opaque metallic marker. Have the students fold the 10" x 18" paper in half, crease, and open.
2. Show them how to draw in pencil a nutcracker that has a hat that touches the top edge, a belt that is on the fold, and shoes that are sitting on the bottom edge. Fill in the nutcracker with details such as boots, shirt button detail and face. The shoulders should nearly touch the sides of the paper.
3. Paint the nutcracker with tempera paints. Lots of red and black make for festive holiday colors.
4. Once the paint is dry, trace over the pencil lines with a black sharpie marker.
5. Use a gold opaque poster marker to fill in detail such as the buttons and cuffs.

Read more »

Wednesday, December 2, 2009

Crayon Resist Snowflakes

If you go to the holiday decoration section at Michael’s, you can find these amazing laser-cut wood snowflake decorations that are cheap (about three for $1) and perfect for making crayon rubbings. These are the same snowflakes I used for the Plaster Paperweight project.
1. I made this picture with a white crayon, but younger students could use bright colors they could see more easily. I placed the snowflake under my paper, and rubbed over it with the side of a large crayon, going back and forth in many directions.
2. Liquid watercolor was painted over all the picture, and dabbed with a paper towel to soak up the paint on the crayon.
Read more »

Tuesday, December 1, 2009

How to Draw a Winter Tree

Winter brings bare trees, and the to chance study and draw them without any worries about leaves. I’ve posted my favorite method of drawing "Y Trees” before (click here) but this time it’s with a winter theme.
1. I drew a large “Y” just using a black oil pastel. Then I added more “Y”s on the branches until it was filled.
2. I made the trunk and middle branches thicker, ending with just points at the tips of all the branches.
3. I drew a horizon line with a blue pastel, and filled in the sky as solid as I could. The darker, the better.
4. After mixing up some watery white tempera paint, I used a brush to shake drops all over my picture. No flinging, just shaking up and down. Let dry flat before you pick up your masterpiece.
Read more »