Total Pageviews

Monday, February 28, 2011

Lollipop Warmup Drawing

My after school drawing class needed a new warm up exercise. A chance crossing with a candy store brought me this week’s solution – lollipops. I handed out the pops and the kids lightly traced the circle and then drew their own stick. The drawings were then traced over with a black marker and filled in with colored pencils. Older students were shown how to add shadow to the stick by just shading half of it gray. And of course, they got to eat the lollipops when they were done. Now my biggest problem is finding something just as tasty for next week...
Read more »

Sunday, February 27, 2011

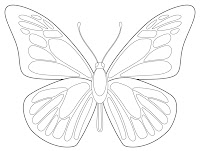
FREE Butterfly Drawing Download

For the study of butterflies, or for symmetrical coloring practice, here’s a blank butterfly I created a while back. I thought it might be helpful to some busy teachers and/or parents. To download the pdf, just click HERE.
Read more »

Saturday, February 26, 2011

Student Art from Chilliwack, BC, Canada

A teacher in Canada wrote that she created a series of lessons about peace, and shared the role that my Warm Hands template played.  I love the way she built her unit around a theme, which you can read about HERE.
Read more »

Thursday, February 24, 2011

Student Art from Mukilteo, Washington

How cute is this? Can you believe that 1st graders made these amazing Picasso Cubism faces? Sonji Sackett, a dedicated art docent, followed my Cubist Paper Bag Costume project and emailed me her results. She noted that “This was one of my best projects this year in terms of the kids being excited by the process and happy with the result. Being able to then put the bag on made it a home run!  Thank you again for all that you share.” Thank you Sonji for keeping art in our school’s classrooms, and thank you to the talented 1st graders at Mukilteo Elementary, WA. Keep on drawing kids!
Read more »

Wednesday, February 23, 2011

Giant Paper Mache Giraffe, Part 1

My experimenting with juice boxes continues. This giraffe requires 32 juice boxes connected with plenty of packing tape to make it extra sturdy. A couple of flat box panels at the base of the neck add contour, and I used small cups for the horns. More to come...
Read more »

Tuesday, February 22, 2011

FREE Dr. Seuss Template Download

I’ve made a blank hat template and posted it HERE to help celebrate Dr. Seuss’ upcoming birthday. I once used it as an art history lesson by reviewing a couple of famous artists (Matisse, Picasso, Van Gogh, etc.) and then asking students to create a hat in their style. I’m sure there are other possibilities, I’d love to hear about them if you have a chance to share.
Read more »

Monday, February 21, 2011

Student Art from Eagle Mountain, UT

I love these Andy Warhol-style cats painted by a third grade class at Hidden Hollow Elementary in Eagle Mountain, UT. Debbie, a mom and art volunteer in her son’s class wanted to proudly share their work, and I can see why. These cats are all so cute and colorful, congrats to teacher and students on a job well done!
Read more »

Sunday, February 20, 2011

Ode to Joan Miro Mural

Joan Miro (1893-1983) was a Spanish artist whose work is often associated with Surrealism even though he never joined or followed any group style. And contrary to the stereotype of the laid-back artist, his productive life resulted in at least 2,000 oil paintings, 500 sculptures, 400 ceramic objects, and some 5,000 drawings and collages. Amazing!

This template contains 36 pages and measures 48"x 60" when complete. As it is an imitation of Miro’s style, and not an exact copy of a painting, it may be colored any way you’d like. Click HERE to see a preview of the template pages. You can purchase my pdf file with instructions for just $5. Click the “Add to Cart” button to make your payment via Paypal and receive download instructions.

Add to Cart
Read more »

Student Art from Roseville, CA

This beautiful Kandinsky art comes from Ms. Domen’s 2nd grade class at Maidu Elementary in Roseville CA. A parent, Tisha Chinn, wrote that the watery glue and canvas worked really well for her. She also recommended “BIC brand permanent markers...their colors are so rich, much more so than Sharpies. The pens were 70 cents each at Staples if you purchased 10 or more and I had the kids takes turns and share to keep my costs down.” Thanks for the tips Tisha, and thanks so much for taking time out to share your beautiful artwork. Best wishes for your school’s annual art auction!
Read more »

Friday, February 18, 2011

Cityscape from Book Pages

I was about to get rid of an old box set of paperback dictionaries, when I realized the pages had just the weathered look that I wanted for a collage project. Lots of other books would work too, it’s just best if they are aged a bit to get that gray cast.
1. Starting with a black sheet of paper (I like scrapbook paper if it is on sale) and several printed pages from old torn up books, students first cut out building shapes. I also handed a printout of black and white city skylines for students to get inspired by, which you can download HERE.
2. Students were to draw lots of windows on their buildings with a fat, chisel tip black marker and then outline the edge of each building with a medium tip black marker.
3. The buildings were glued down with a glue stick.
4. White details were added to the sky using a white colored pencil.
Read more »

Thursday, February 17, 2011

Laurel Burch Cat Heads

This cat project was inspired by a talented artist named Laurel Burch, who sadly passed away recently. She had a wonderful style of drawing abstract cats with large eyes that met in the middle.
1. Ask students to make three dots (in pencil) across the center of a paper as per the diagram. The 3 dots are connected to make the eyes. A triangle nose is added, nose lines and mouth. Lastly, the outside of the head is drawn around the head.
2. Students use a black Sharpie marker to trace all their lines.
3. Distribute oil pastels and encourage the students to use unusual colors to fill in their cat and background.
Read more »

Wednesday, February 16, 2011

Van Gogh Starry Night

I like having students make their own simplified version of famous paintings, which can encourage their appreciation of the original.
1. View Van Gogh’s “Starry Night”, and discuss the composition; the foreground tree, the middle ground hills, and the background stars.
2. On a 12" x 9" turquoise paper, have the students draw their own simple tree or bush, just to the left of the center. Behind the tree are several simple hills. In the sky are at least 3 small circular stars. The students are to make the stars and hills "grow" with a series of larger circles and curves. Encourage them to make just a few of each with lots of space in between.
3. The pencil lines are traced with a thin black marker.
4. Lastly, good colored pencils are used to color all the shapes in.

Read more »

Tuesday, February 15, 2011

How to Draw a Dragonfly

Today I demonstrated the basics of drawing a dragonfly to a room full of kinder and 1st graders, and they added so much 6 and 7-year old charm (hearts, flowers, hairbows, etc.) that I could hardly stand it!
1. Students draw a circle head, wide oval, smaller oval and tail, all across the middle of the paper.
2. Three wing lines are drawn going up from the widest oval.
3. Each line is continued and turned into a wing.
4. Two lines are drawn up in the middle of each wing.
5. Small angled lines are added. The face is completed, along with the feet. The drawing is traced with a black Sharpie and colored in with crayons.
A special thanks to Yuna, a talented 1st-grader, who let me share her drawing with you.
Read more »

Monday, February 14, 2011

Drawing Class Tips

I’ve been holding afterschool drawing classes for a few semesters now, and I’d love to share a few things that seem to be working pretty well. Whether you’re looking for extra income or just volunteer ideas, here’s what might help you run your own class, should you be interested.
1. I start with a quick exercise using just paper, pencil and some small plastic toys like these. The students have just a minute to slowly draw only the outside edge. When...
Read more »

Sunday, February 13, 2011

Glitter Heart Painting

One last heart project that I want to share because it’s the first time I let students use only Dick Blick Glitter Watercolor Paints. The results were more like finger paintings, and the glitter is only visible close up, but I love the colors.  
1. I used a die cutter to cut one heart in the center of a 7" square piece of chipboard, and then trimmed my oversize watercolor paper to allow two rows of three hearts, 21" x 7". This was good for kinders as they had to practice lining up the squares.
2. I gave the students only crayons to draw the hearts and squares and then patterns inside. I’ve learned that pencils often lead too complex pattern drawing that takes too long to trace.
3. When the drawing was done all, the hearts and boxes were painted over with different watercolors.
Thanks to Lucy L., a wonderful artist in 1st grade, who let me share her painting.
Read more »

Saturday, February 12, 2011

Valentine’s Day Card, FREE Download

To make a super quick Valentine’s Day Card, just click HERE and download my template that you can color, fold and deliver. The letters all come from one of my favorite education art sites, ClipartETC.com.
Read more »

Friday, February 11, 2011

An APFK Butterfly in Haiti

I recently received this amazing email:

Hi Kathy,
As a fellow art teacher and a fan of your fabulous blog, I wanted to share with you some pics of where the butterfly mural that I'd downloaded from your blog has been. A group of five woman (myself included) ...
Read more »

Thursday, February 10, 2011

Valentine Heart Painting

Jim Dine is considered an important contemporary artist who helped to create the Pop Art movement. He used different popular imagery in his art, but hearts seemed to be his favorite.
1. This watercolor resist painting uses rubber cement to help make an ...
Read more »

Wednesday, February 9, 2011

Art Journaling 122, Valentine’s Day

I plan to do this page layout with my afterschool art journal class. It involves layering crumpled tissue paper shapes with watery glue. I like how it looks somewhat like a poor man’s rice paper.
1. I folded and cut out some red tissue paper hearts, and glued them down to my paper with some dabs of glue stick.
2. I mixed up some glue and water until it was about the consistency of milk, and sparingly brushed it over...
Read more »

Tuesday, February 8, 2011

Paper Mache Valentine Heart Box

I used modeling clay to first form these Valentine heart boxes. If you can buy the clay at a ceramic supply store, it can be pretty inexpensive.
1. Each student got a piece of clay to form a ball to shape into a plump, round heart which they wrapped in plastic wrap.
2. The students covered the hearts with at least two layers of paper mache. The hearts were left to dry thoroughly over several days.
3. In the second class I used a utility knife to cut around the outside edge of each heart. The kids had fun opening up the heart and removing the plastic wrapped clay. They then painted all surfaces with acrylic paint.
4. Students coated all surfaces with Mod Podge, and some sprinkled on a little glitter for extra sparkle.
Read more »

Monday, February 7, 2011

Tinted and Shaded Valentine Heart

Layering oil pastels to make smooth gradations takes practice. This project will let students do just that.
1. Starting with a square paper, students draw a large heart in the middle, and then use a ruler to draw at least four lines completely across the paper.
2. Using smooth oil pastels, like my favorite Portfolio® brand, students color in the heart and background with just one color each. Because of the transparent nature of my pastels, I could still my pencil lines when I was finished.
3. Students use a gray pastel to color a shadow over half of each blue background section. On the opposite side, a white pastel is used to make a tint on the remaining side. This process was repeated randomly to all the background sections, and then to all the red sections.
Read more »

Sunday, February 6, 2011

Jim Dine Shiny Valentine

Jim Dine, an American Pop artist, used a lot of common images in his art, but is best known for his heart paintings. His creative style is one students can really appreciate as he liked to experiment with colors.  
1. A sturdy backing is needed for the aluminum foil drawing. Old matte board is good, but any smooth chip board would do. Cut the board into 5" x 7" rectangles.
2. Distribute a board, glue stick and many colored Sharpie markers. Tear or cut a rectangle of aluminum foil about 7" x 9" for each student. The students cover one side of the board in glue, and then center and wrap the foil around it with the shiniest side out.
3. Students draw one large heart in the middle of the card, and then 3 or 4 straight lines from edge to edge that dissect the card.
All the sections that are made from this are to be colored in with different Sharpie markers.
Read more »

Saturday, February 5, 2011

Mini Valentine’s Day Mural Set

This mini mural set includes three different Valentine layouts, full of large and simple doodle shapes that will be fun for students of all ages to color. You can even tape them together first to eliminate any matching color issues. Click HERE to view the blank templates and finished dimensions.

You can purchase my pdf file with instructions for just $5. Click the “Add to Cart” button below to make payment via Paypal and receive download instructions.

Add to Cart
Read more »

Friday, February 4, 2011

Hearts & Trees

Architect Frank Lloyd Wright told his students, “Limits are an artist’s best friend.” That’s because they force us to find answers we might not otherwise have discovered.
1. The goal for this students is to make a really simple, bold image, so some restrictions are put in place. Ask the students to draw a picture with only one tree, one simple hill, and hearts that may be any size, and any place on the picture. No sun, no clouds, no flowers – just a tree on a hill with as few or many hearts as they wish.
2. After the drawing is complete, the students use a black Sharpie to trace all the lines.
3. Lastly, they colored in all the shapes with oil pastels, any color they want, any combination. I was amazed at the variety the kids came up with; no two were even closely alike.
Read more »

Thursday, February 3, 2011

Tinted Valentine Hearts

First graders need practice mixing secondary colors, but I just can’t get too excited over making color wheels on paper plates. Instead I had them focus on just mixing purple (plus a little white) in honor of Valentine’s Day.
1. I made an 11" x 17" size template of printed hearts which you can download HERE. Print at 77% for an 8.5" x 11" size template.
2. Students received printed paper, a paper plate of red, blue and white tempera paint, a brush and a cup of water. They were to see how many new colors they could mix, and then fill in the hearts as they wish.
CA Visual Arts Standard: 
2.2 Mix secondary colors from primary colors and describe the process.
Read more »

Wednesday, February 2, 2011

Wayne Thiebaud Cupcakes

Wayne Theibaud is famous for his paintings of cafeteria style food. He used lots of repetition, so having students create multiple cupcakes was a good way to imitate his style.
1. I gave each student a 3.5" square piece of paper and pencil and had them draw a simple cupcake. Then I gave them a 3.5" square of carbon paper and showed them how to trace and make a copy. If they traced their first drawing onto the middle of a 9" x 12" paper, and then one on the left and one on the right, the drawing had a good chance of being balanced.
2. A table line was added, all the lines were traced with a black marker.
3. The cupcakes were colored in with any colors the students chose.
Read more »

Tuesday, February 1, 2011

Custom Light Switch Plates

I saw this project in an Arts & Activities magazine. When your fridge and walls are already filled with your child's art, have them paint your switch plates!
1. Your local hardware or home improvement store carries plastic switch plates for every need and they're quite inexpensive.
2. Provide the students with lots of acrylic paint and a switch plate and maybe some ideas of subject matter. Small motor skills are needed so they should think of detailed images to make the most of their “canvas”. Be sure to have lots of thin paint brushes too so that painting tiny details is possible.
3. After the plate is painted, spray with a sealer to protect from scratching.

Read more »