Total Pageviews

Wednesday, March 31, 2010

Art Journaling 126

My young journal students seem to work best with multi-step projects, so this stamp, trace, write and color page kept them busy for most of our 60-minute class. Plus, I love the irregular pattern that the watercolor makes.
1. Save your paper towel and toilet paper rolls, because they make great disposable stampers, using watercolor paint. I had a theme of "blue" going for the day, so I filled small bowls with a little watery paint for students to stamp circles on their journal pages. A paper towel dabbing then dried the pages pretty quickly.
2. Using a gel pen, the students were asked to trace around both sides of the circles they made, taking care to follow all the wiggly edges.
3. Using the gel pens again, I had the students brainstorm on all the different colors of blue they could think of. Newly made up words were encouraged.
4. The students used a colored pencil to fill in the area around the circles. Dark coloring was encouraged to create a lot of contrast. Lots of variations of this process are possible.
Read more »

Tuesday, March 30, 2010

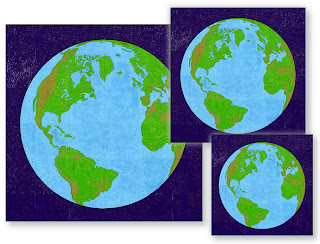
Mini Blue Planet Mural Set

My Mini mural work continues with a new three-size set of my original Blue Planet mural. Thanks to some inquires about needing smaller sizes for a variety of needs, I made this pdf file to include a combination of a 12-page, 6-page and 4-page murals. Click on the image to see the template layouts.

You can purchase my pdf file with instructions for just $5. Click the “Add to Cart” button below to make your payment and receive download instructions.

Add to Cart
Read more »

Sunday, March 28, 2010

Dinosaur Fossils

This is really fun for students that are learning about fossils and imprints.
1. I found some inexpensive plastic dinosaurs skeletons at Oriental Trading Company, which are perfect for this project. I used regular clay for the imprints, play dough would work also.
2. To prepare for the plaster pouring, give each student a 5" square of cardboard, an 11" x 2" strip of heavy weight paper, a bit of tape, and the 2.5" ball of clay. The students are to tape their strip of paper into a ring, overlapping about an inch. With the paper ring laying on the cardboard, they should make their ball into a flat "pancake" that will fit inside the circle.
3. With the "pancake" removed from the paper ring, the student is to take a dino and make an impression into the clay, using the side of the head. If there is room, a foot print may be added. Make sure they make a firm imprint.
4. The "pancake" gets placed back in the paper ring, impression side up. Plaster is mixed with water until it is the consistency of pudding, and then poured into the ring. Pour enough plaster to make a layer that is about 1" thick.
5. After the plaster has dried (about an hour) the paper ring can be torn away and the dough can be removed. If it sticks to the plaster, let it dry 24 hours and then scrub with a brush under water.
6. After the plaster fossils are clean and dry, paint them with very watered-down paint. Watercolor or tempera work, anything to give the plaster a muddy look.
My son loved making this model in the 2nd grade.
Read more »

Saturday, March 27, 2010

Sunset Cityscape

This is a project that lets even the very young make a bold and colorful image. I found it on the Artsonia.com website.
1. I gave the students a letter-size watercolor paper, and liquid watercolors. I found it helpful to have at least five color choices so that the background could have lots of variety. The students are to paint about 1" wide stripes from left to right until the paper is filled with color.
2. While the paint is drying, give the students long sections of black construction paper that they can easily cut down into buildings. Encourage different rooftops for variety.
3. Give the students long stripes of yellow paper that they can easily cut into window shapes. Those windows are then glued to the buildings.
4. Lastly, the buildings are glued to the painted paper.
Read more »

Friday, March 26, 2010

The “Inkblot” Book Winner is...

Jacqueline who wrote...
“Looks like a great book. It reminds me of a lesson I did with my 4th graders where we used a straw to blow watercolor blots all over the paper. Mistakes were encouraged. We ended up calling it Great Mistakes. The kids loved it!”

Please email me your mailing address Jacqueline, so that I can get your book out to you. And thanks to everyone for participating with all your kind comments. More giveaways will be coming soon.
Read more »

Thursday, March 25, 2010

Draw A Textured House

I did this house drawing last year with kinders, and remembered having a lot of success with it. This year I just added a texture element, which came from slipping a small piece of window screen underneath while coloring.
1. I started with tabloid card stock paper from Staples (11" x 17") which worked really well for both size and coloring. The students followed my direction on the board, and drew a ground (horizon) line first, and then the house shape on top. If this shape was difficult, they could instead draw a box with a triangle on top. Two equal horizontal lines were added to the top of the roof as shown, with the bottom one extending out a bit further than the top. Lastly, the ends were connected from the top of the roof down to the ground.
2. With the house shape complete, the students could design the rest of their building, added windows and doors and chimneys as desired. If space around the house was available, they could add trees, clouds and more, whatever they could think up. When their drawing was complete, they traced everything with black Sharpie markers.
3. Small pieces of window screen were passed out when the students were ready to color. They could slip a section (about 10" x 5") under their paper while coloring, to make some or all of their paper textured. The only rule was they had to color everything in, no blank sky or ground.
This picture was made by Neariah, a kinder. Thanks for letting me share your art Neariah!
Read more »

Wednesday, March 24, 2010

From Geometric to Organic

This is a fun and easy project that shows how you can turn geometric shapes into organic ones.
1. You could have students draw a set of triangles, circles and squares, but I found it easier to have cardboard templates to trace. This keeps students from trying to draw the perfect shapes themselves, which can sometimes slow things down. Ask them to trace several shapes on their paper, some preferably overlapping. Important note: they need to leave some white space, they should not fill in the entire paper.
2. After the pencil shapes are drawn, they are to be colored in with a NON-permanent, waterbase marker. This is the time to use those cheap, fat store markers as you actually will be wanting the colors to bleed.
3. Pass out small cups of water and show the students how to drop several puddles on their artwork with a brush or dropper. If they pick up the paper and roll the water around a bit, it should start to make lots of colored streaks and blobs. Repeat this until almost all of the artwork is filled with wiggly colored lines. Let dry overnight.
4. Now comes the fun part, taking a thin black Sharpie and tracing all the organic shapes that were made from the running water. The students need to work slowly to trace all the wonderful edges they see, both inside and outside the colored shapes. The more time they put into the tracing, and the more detail they see, the better their artwork will look.
Read more »

Tuesday, March 23, 2010

How to Make a Mola

Molas are handmade textiles from Panama which use a reverse appliqué technique. Several layers of different-colored cloth are sewn together and the design is then formed by cutting parts of each layer away. While that technique is pretty intricate, the look can be imitated by layering construction paper.
1. The process starts with choosing the main animal shape. It should be a simple silhouette that the student can draw themselves. In this case I started by drawing and cutting out an orange fish.
2. The orange fish is glued onto a larger piece of yellow construction paper and cut out leaving an edge of yellow all the way around.
3. The orange and yellow fish is now glued onto a piece of red construction paper and likewise cut out leaving an edge of red all the way around.
4. Now it's time for the details inside the fish body. I cut an eye out of red paper, glued it to a yellow backing and cut it out. A fin was cut out of yellow, glued to red, and cut out. The eye and fin are then glued to the fish body.
5. Glue the entire layered animal to a black piece of construction paper. For more advanced students, the layers could be continued as classtime allows. The more layers, the more colorful your mola.
Read more »

Monday, March 22, 2010

Alien Names

I thought I would get a so-so response to this lesson, but found that the students were delighted to see how 'alien-like' their names could be, and amazed at how different all their artwork was.
1. Give the students an 11" x 17" paper and ask them to fold it in half lengthwise. With the paper folded, they are to write their name in cursive, adjusting to fill the paper as much as possible. The bottoms of the letters should always touch the fold of the paper. Any descenders (such as the bottoms of g's, j's or y's) need to be ignored for this project.
2. I had the students go over the pencil lines with a large black Sharpie. If they also trace the backside, fold, and trace again on the remaining side, they will eventually have one side with reflecting names.
3. The fun part is to have students turn their drawings into some kind of creature. They can draw details with a thin marker and then color sections in with crayons. If a symmetry lesson is desired, tell the students that whatever color or pattern is made on one side, must also be done on the other.
Read more »

Sunday, March 21, 2010

Gustav Klimt Drawing

An Austrian painter, Gustav Klimt lived in the early 1900's and started his career as a decorator. He is probably most famous for his painting named "The Kiss".
1. The first step is to give the students black construction paper, magazines with lots of people in them, scissors and a glue stick. Instruct the students to look for a person in the magazine that has exposed arms. They are to cut out the head and arms as three separate pieces.
2. The body parts will then be arranged on the black paper in the same manner they were in the magazine. Have the students carefully glue these down with a glue stick.
3. The fun part! You'll need some gold paint markers, which are not cheap, but they are SO fun to draw with. Explain again to the students that Klimt was considered a master at both decorating and painting and they are to fill in their person with an amazing, over-the-top piece of clothing and then lots of pattern all around the background until there is no more room. NOTE: The paint markers are not rated safe for young children. Use at your discretion with students that you trust will not stick them in their mouth or give classmates gold manicures.
Read more »

Saturday, March 20, 2010

Butterfly Specimen in a Box

I was inspired by a painted butterfly over at Genine’s Art Blog, and simplified the look for kids with Sharpie markers and an origami box.
1. I started with an 11" square of white cover stock paper to make my box. Click on diagram below.
2. I made my butterfly by folding a 6" x 4.5" piece of white paper in half, lengthwise. I like using any kind of coated paper as the permanent markers glide on so easily. I drew my butterfly profile and cut it out.
3. I opened the butterfly and added the details in pencil trying to maintain the symmetry. I then traced the details in black and filled them in with permanent markers.
4. To mount my butterfly, I cut a strip of foam core small enough to fit behind the body and I taped it to the box. I then secured the butterfly with two small push pins – just like real entomologists do!
CA Visual Art Standard: Creative Expression, Grade Two
2.5 Use bilateral or radial symmetry to create visual balance.
Read more »

Friday, March 19, 2010

Cool and Warm Color Collage

The very first color theory lesson that students as young as 1st grade can learn is which colors are considered 'warm' and which are 'cool'. Seeking out examples of the colors in magazines and using repetition helps store these two categories to memory.
1. I used my computer and printer to make sheets with windows and outlined words, but this could be done by hand and and xeroxed as well. I folded an 11" x 17" paper, cut two 4" x 5.5" windows and wrote "cool" and "warm" just below them. I cut out the windows for the young students as an xacto knife worked best for the job. It also helps to trace each window to the inside of the paper so that the students know how big of an area they need to cover with their collage.
2. Give each student a prepared folded sheet, several magazines, scissors and glue stick. Show them an example of warm colors (think of the sun) red, orange and yellow, and then cool colors (like the ocean) blue, green and purple. They are to look for swatches of each and glue them into the appropriate rectangle, overlapping them as they go. Once both rectangles are filled, the top can be closed down and taped together if desired. Having a clean window frame around the collage helps for students to see how the colors each have a cohesive look as a group.
Read more »

Thursday, March 18, 2010

How to Draw a Dragon

This was my son's favorite art project from his 5th grade school year. The popularity of the dragon theme had even some of my most hard-to-reach kids decide to give drawing another chance. I broke the drawing down into steps, had the students wait for everyone to finish each step, and I led by drawing an example on the board.
1. I cut out cardboard templates in the shape of the head to help all the students get a consistent start with their drawing. Have them place the template on a large paper as shown, 17" x 11" is good, and trace with a pencil. Next comes the neck, which extends to the right in a partial 'S' shape. A long horn is added to the top.
2. A pointy spine is added to the right of the neck.
3. The neck gets a curved parallel line in the middle and 'V' shapes going down the left side. Another horn coming out of the cheek is added. A small horn is added on top.
4. To complete the face with a curvy mouth, teeth curving down, an eye, nose and horns. When the drawing is complete, trace with a black marker and have fun coloring in!
Read more »

Wednesday, March 17, 2010

Watercolor and Salt Painting

My afterschool watercolor class has been a lot of fun, and it keeps me on the lookout for simple images to paint.
1. For this painting, I plan to have the students trace a small cup for a round head. A line is drawn to the right, and curve below to make a large half circle for the body. Two legs are added, curves for the tail, and details on the head. All these lines are traced with a crayon when complete.
2. My favorite way for young ones to paint is still with dissolved watercolor tablets. They can just concentrate on filling the shapes, and not about getting the right amount of water mixed with the paint. 1’m going to have the students paint the body first, and then sprinkle a bit of salt on it while the paint is still wet. The salt absorbs the water, makes a cool texture, and may be rubbed off when the entire painting is complete. After the body is filled, the background may be painted in with one or more colors.
Read more »

Sunday, March 14, 2010

Mini Impressionist Mural Set

Thanks to the popularity of my first two Mini Mural sets, I’ve created a third in honor of the Impressionist masters: Vincent Van Gogh, Georges Seurat, and Paul Gauguin. My Mini Murals are great for smaller groups, ambitious individuals or family fun. (Click on the image to view the blank templates and final sizes.)
You can purchase my pdf file with instructions for just $5. Click the “Add to Cart” button below to make your payment and receive download instructions.
Add to Cart
Read more »

Saturday, March 13, 2010

Overlapping Rings

This is a good exercise for students to learn how to use lines to make images look like they overlap, and how to use color to give your art depth. The ability to overlap shapes is a kind of pre-cursor to learning how to draw in perspective.
1. I found that rolls of masking tape make the perfect template for students to trace circles. They are easy to hold and very easy to trace. If you give each student a new roll of tape, ask them to trace both the inside and outside so that lots of rings are both overlapping and even going off the edge of the paper. Just make sure that they don't go overboard as too many rings may get too confusing to work with.
2. After all the rings have been traced in pencil, show the students that they must decide which ones are in the front, and which are in the back. If a ring is in front, they must erase all the lines inside the ring. Once all the rings have been layered and none look "see through", they may use a thin black marker to trace the pencil lines.
3. When coloring the rings, show the students examples of how master artists have long used color to give their paintings depth. Generally, the further away an object is, the lighter the color. If you have posters of classic landscapes, you can illustrate this idea. Show the students that the rings closest to the top should have the darkest color, and the one furthest away should be the lightest. When complete, you will have an assortment of rings that are not only showing depth with lines, but with color as well!
Read more »

Friday, March 12, 2010

Layering and Shading Exercise

I used to introduce 3rd and 4th graders to shading and tinting techniques with circles and spheres, but found this week that straight lines worked much better. The students could just concentrate on adding color to lines, instead of dealing with tricky curves.
1. I had the students start with a sheet of black paper, a ruler and pencil. Instead of planning their entire drawing first with a lot of pencil lines, I insisted that they draw, color and shade each “pipe” first, before going on to the next. So, as shown in my diagram, they were to first draw two parallel lines on their paper, either horizontally or vertically – no diagonals allowed. When complete, they colored in this “pipe” a single main color, whichever they prefer.
2. When the “pipe” was filled with color, the students were to use a white pastel and add it on top of one side, and black pastel on the other. It was important that they go back and mix the main pastel color on top so that everything blended together and the colors didn’t look too striped. Soft gradations of color were the goal.
3. This step was repeated at least three times so that the students ended up with a picture that had one “pipe” in front, one in the middle, and one in the background. This project is packed with learning objectives (tinting and shading and layering) but brought some very amazing results from a group of talented kids I was fortunate enough to work with.

CA Visual Arts Standard: Grade Four
2.1 Use shading (value) to transform a two-dimensional shape into what appears to be a three-dimensional form (e.g., circle to sphere).

Read more »

Thursday, March 11, 2010

Art Journaling 125

I finally had a chance to try printing with bubble wrap, and loved how it worked in my art journal class this week. There were so many colorful variations of my sample shown here.
1. I cut panels of bubble wrap that were smaller than the journal pages so that the paint wouldn’t go all the way to the edges. The students were given a brush, acrylic paint and paper plate. After spreading the paint out on the plate, the bubble wrap was pressed into the paint (bubble side down) and then printed in the center of a blank journal page.
2. After a successful print was made, the students pressed a paper towel on top of the page to absorb any extra paint.
3. When the paint felt dry, the students used colored pencils to color in the bubbles. I love how they look like marbles all lined up in a row.
Read more »

Wednesday, March 10, 2010

Andy Warhol Portraits

Andy Warhol's repetitive style is fun to duplicate and the perfect example for students to create their own repetitive drawings using Sharpies on acetate.
1. Review some of Andy Warhol's portraits of Marilyn Monroe, Elvis Presley, etc. Collect several photos of celebrities or of the student's themselves and copy in black and white. Let the student's choose one photo, and give them 3 sheets of acetate and a black Sharpie marker.
2. Ask the students place the acetate over their photos and trace the edges in black. When tracing is complete, the voids can be filled in with colored Sharpies. After one drawing is complete, the students are to make two more, using a variety of colors.
3. Trim the acetate if necessary. Using colorful card stock, cut three paper frames to fit the size of the art. Tape the acetate to the back of each frame. The panels can be posted flat to a wall, or taped together to make a z-fold card.
This sample was made by a 2nd grader.
Read more »

Tuesday, March 9, 2010

Ceramic Cupcakes

I saw this project over at Artsonia.com a while back and it's been a huge hit. I use a kiln but you could air dry the clay and paint it with acrylics to get much of the same effect. I found silicone cupcake holders in the food dept at Michael's Arts & Crafts that make this process much easier.
1. Give each student one cupcake holder and enough clay to make a smooth ball about 2" in diameter. Then have them press the ball into the cupcake holder, first pressing in the center and then working the clay against the sides to form a bowl.
2. Have the students make another 2" ball and shape it into a small "pinch pot" for the cover.
3. Then, a small piece of clay is used to shape the cherry. Before attaching, the contact points of the cherry and the pinch pot top must be roughed up to assure solid contact. Smooth surfaces don't adhere well.
4. Either fire in a kiln or air dry and then cover with acrylic paint.
Read more »

Sunday, March 7, 2010

“Wild Thing” Watercolor Monster

Maurice Sendak's book "Where the Wild Things Are" is a natural intro to this project.
1. I recommend using large (15" x 22") watercolor paper as it helps the students make generous shapes that are really vivid when later painted. Drawing paper will look pale and curl up - trust me I found out the hard way! Have the students mark with a pencil the center of the paper, and then draw a circle from that which fills the top half of the paper. Explain that the students will be drawing a monster of their creation, but it must have a large head like those shown in the Sendak book.

2. Next, they should draw a body under the head. Legs and arms are to be added, along with a silly face. Lastly, details such as clothing lines and circles are drawn. Give each student a permanent black marker and ask them to trace all the pencil lines.

3. Distribute watercolor paint that is made from tablets that have been dissolved in spill-proof cups. Ask the students to paint in all the shapes they have drawn, including the background. This monster was created last year by a 1st grader.
Read more »

Friday, March 5, 2010

Starry City Night

Vincent Van Gogh's “Starry Night” painting has inspired many an art project, and this is just one more.
1. Distribute 9" x 12" watercolor paper, and ask students to make several large yellow oil pastel circles of various sizes in the top half. Next they are to draw with a blue oil pastel lots of curvy lines that go around all the yellow circles.
2. Give the students blue liquid watercolor paint and have them “wash” the entire paper with the blue paint.
3. Each student is to take a 6" x 12" sheet of black paper, and with a white oil pastel, draw a sky line that stairsteps up and down to make a building silhouette. (Make sure that the skyline is drawn horizontally and not vertically to match the watercolor paper.) Lots of details should be added, like windows and doors.
4. Lastly, the black silhouette should be cut out and glued to the sky background.
Read more »

Thursday, March 4, 2010

Glue and Pastel Landscape

Kids are SO lucky that new art supplies seem to constantly show up in stores these days. In my day, just having a 64-box set of crayons meant you were decked out.
1. I used Art Stix from Prismacolor for this picture, but any chalk pastel would work too. However, if your kids are squeemish about chalk texture, try these new Stix as they have none of that quality but all of the color. Give each student a piece of black construction paper. Have them draw, in pencil, a very simple landscape with hills, water, sun and possibly mountains.
2. When the drawing is complete, they are to trace all the lines with white glue squeezed from a bottle. Don't worry about wobbles, they end up looking nice and 'hand made' I think. Just try to not make huge puddles. Let the glue dry at least a day.
3. With either the chalk pastels or Art Stix, instruct the students to use at least two colors in each section of the picture. For example, dark and light blue for the water, dark and light green for the grass, etc. This will give the artwork some shading and depth and add a lot more interest to their work.
Read more »

Wednesday, March 3, 2010

Art Journaling 124

A simple stamping project worked really well in my afterschool art journal class today. The theme was “Circles”, which some kids turned into faces, some into flowers, and some into sports images, as in this example.
1. I had saved all the center cardboard rolls from my paper towels for quite some time, and found they were the perfect disposable tool to do some quick printmaking. The students dipped them in about 1/2" of liquid watercolor, and did some repeated stamping onto their papers. When the page was full, they gently placed a paper towel on top to soak up extra paint.
2. The paper dries pretty quickly, so I passed out pencil crayons and told them to just be creative with coloring them in. One student even made what looked like a really beautiful wedding ring quilt pattern by overlapping all her circles. Love their creative minds!
Read more »

Spheres in Space

Learning how to turn a circle into a sphere can be lots of fun if you use an outer space theme.
1. Die cut presses and heavy mat board were invaluable for making quick circle templates. I created 2" and 3" templates with circles cut out of the middle so students could easily see and trace five to seven 3" circles in pencil on a black sheet of paper. Encourage students to draw some circles that go off the paper to add more interest.
2. Using chalk pastels, each circle is to be colored in with one main color.
3. Explain briefly the idea that there is a source of light (like a big sun) shining on these planets. The students need to decide where their sun is in relationship to their planets. If the sun is off the page to the right, as on this example, they should use a white chalk pastel and color a curved shape on the right side of the circle. Then an opposite black shadow curve needs to go on the opposite side. After coloring as shown in the diagram, show the students how to blend the edges together. There should be no hard edge between the colors when they are done. 4. Oval rings and tiny stars may be added as a final step.
CA Visual Art Standard: Creative Expression, Grade Four
2.1 Use shading (value) to transform a two-dimensional shape into what appears to be a three-dimensional form (e.g., circle to sphere).
Read more »