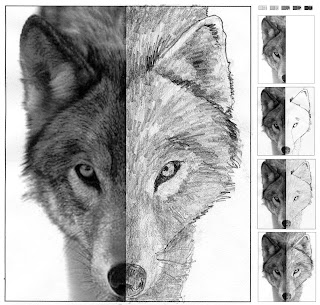
 When students have a photo to refer to, I think they are often pleasantly surprised at what they can draw. This is one of my “Finish the Picture” templates, where the students are asked to fill in, shading and all, the missing half of a photographed face. I’m happy to share my wolf template with everyone HERE.
1. The students first practice their shading by matching the values of the grays at the top of the paper. The goal is to have them see they can make not only dark and light pencil shades, but medium light and medium dark as well.
2. The drawing starts with finding and drawing as many edges of the face as possible. The eyes and nose are pretty easy to see, but the ears take a little more time.
3. This wolf has a mostly medium gray base to him, so once the edges are in place, the entire wolf is shaded lightly with the side of the pencil. Students should be reminded to keep the direction of this sketching the same direction as the fur. No quick shading in one direction just because it is faster; nice drawings take time.
4. Lastly, the students need to look for really dark areas that they should fill in with heavy pressure. One tip is turning the drawing upside down to get a fresh look at it. I’d love for students to learn they can draw in layers like this, which encourages a greater depth to their shading. Sketches with lots of light, medium and dark tones make for a much more interesting picture than those without.
CA Visual Arts Standard: Grade Three
2.4 Create a work of art based on the observation of objects and scenes in daily life, emphasizing value changes.


 12:41 PM
 keprok


0 comments:
Post a Comment