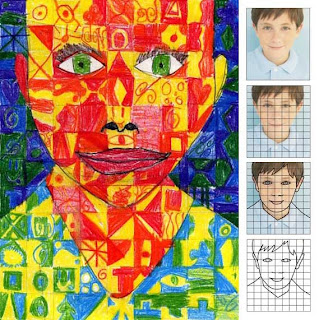
 Chuck Close is an American painter and photographer who first achieved fame as a photorealist. This project, which imitates his style, takes a bit of planning, but the results can be spectacular.
1. Take digital photos of the students. With my computer graphics software, I cropped the faces in Photoshop and printed them out (black & white) to fill an 8" x 10" box. Cut out all the photos.
2. Create and print an 8" x 10" grid sheet filled with a 1" lines for each student. Cut out all the grids. Cut sheets of carbon paper that are 8" x 10" square. Stack the photo on the carbon on the grid paper. Tape together. The students are to trace all the edges of their faces on the photo, which will transfer to the grid.
3. Once the face edge lines are on the grid paper, instruct the students to pick a pair of pencil crayons each for the face, neck, background and hair. Each square in these areas is to be filled with any kind of shapes and patterns, but only with the chosen pair of colors. Repeat until all the areas are filled. The eyes look best just colored normally without any patterns.


 9:42 PM
 keprok


0 comments:
Post a Comment