Total Pageviews

Showing posts with label craft. Show all posts

Saturday, April 30, 2011

Tissue Paper Flowers for Mother’s Day

Need a pretty but inexpensive project for Mother’s Day? All you need is an old baby food jar, tissue paper, white glue and a couple of green pipe cleaners.
1. Tear blue tissue paper into small little strips. Make a 50/50 mix of white glue and water, brush on the outside of a baby food jar, and apply overlapping strips of tissue paper. Continue until the jar is covered. Brush a final layer of mixture over all to smooth the surface before it dries. Let dry.
2. My inspiration for the flowers comes from “Tissue Paper Flowers” by the editors of Klutz. Proportion of the flowers to the jar is important, so I’ve made a pattern that you can download HERE. You make a small green folded “nubs” on one ends of the pipecleaners, slide on two yellow circles, and two white star flowers. Use a small amount of clay or playdough inside the jar to support the stems.
Read more »

Sunday, April 17, 2011

Egg Decorating from Macedonia

Lila Arsova, a teacher from Veles, Macedonija, recently sent me this wonderful series of photos showing how she decorated her eggs with some very colorful springtime napkins. I think her step-by-step pictures say it all, and cross any language barrier that might come between us. I personally have never seen any treatment quite like this, and am amazed at how beautiful the eggs are, not to mention the lovely documentation of them. Thank you Lila for taking time out to share your amazing creativity.
Note: I believe that the photos pretty clearly demonstrate the process, with the exception that Lila’s uses egg white to attach the napkin to the egg. What a great way to keep the process all natural.
Read more »

Thursday, April 7, 2011

Paper Mache Eggs, for Easter or Spring

I love springtime crafts that more or less imitate nature. I experimented with covering plastic fillable easter eggs with paper mache, and came up with this simple decoration.
1. I used the recipe that I posted about here, and covered a few plastic eggs with small bits of newspaper and mache. Several layers are best so that no plastic is peeking through. Let dry completely. Note: This worked well even with kinders as their small hands could really squeeze the eggs to smooth the paper.
2. Brush the eggs with one main light acrylic color and let it dry. Then use a small amount of darker paint for texture. Brush it on so that the eggs look to have 50/50 covering and let dry.
3. Rub on some gold tempera paint by hand to give the eggs a little shine.
4. Use a natural looking, bumpy yarn and unroll it into a small round pile for the nest. The result is a really nice centerpiece for any table.
Read more »

Monday, March 28, 2011

Baby Plant Craft

A parent recently donated a LOT of baby food jars, so I’ve been playing around with some different ideas. This comes purely from supplies that were on hand: peat moss, grass seed, and white paint marker. I wrote a simple message so the roots could still be seen, but a row of clear grassy jars would be pretty too. Could be a nice welcome to spring.
Read more »

Sunday, March 13, 2011

Bleach Pen Jeans

There seems to be lots of decorative art in fashion these days (think peasant / ethnic wear) and this is a good way to imitate that look without using a single needle or thread.
1. As part of a weekend class, I had students bring in an old pair of jeans. They first planned their decoration on paper so I could see if it was looking too intricate or not. Simple lines with lots of space between work best.
2. Once a paper plan seemed complete, students drew the design on the jeans with a sewing marker that washed out if mistakes were made.
3. Small swatches of cut-up denim were passed out for the kids to practice on. Each student needed their own Bleach Gel Pen, which you can find at many grocery stores or online. These pens take a little practice to make a smooth, thick line of bleach, but work great when you do.
3. Students drew over their sewing marker line with the bleach pens. Fat lines that look like the thickness of yarn were best. The jeans needed to dry at least a half hour after completing all the lines. The longer the wait to wash, the whiter the lines would be.
4. The bleach was rinsed out in water. Once the students got their clothing home, it needed to be machine washed and dried.
Read more »

Thursday, January 27, 2011

Plaster Snowflake Paper Weight

This is a variation of my Dinosaur Fossils post, but uses a snowflake ornament instead. I found thin wood-like snowflakes at Micheal’s that were just three for $1. This paperweight measures about 5" wide by 3/4" thick.
1. I cut a 6 inch square piece of cardboard just as a plate to hold my cast until it dried. I took a handful of
Read more »

Saturday, January 22, 2011

Homemade Valentine Card

If you can get your hands on some fancy colored paper, this simple layout can make a really nice card. I had a sample pad of rice paper from an old scrapbook collection that worked well.
1. I used a white card stock paper that was letter size, and folded it in half to make a 5.5" x 8" card. Random squares and rectangles were cut to fit the paper in a loose grid, and were glued in place. Glue sticks work great so there are no wrinkles from wet glue.
2. With the scraps remaining, I folded them in half to cut hearts that would fit each square or rectangle, i.e. tall skinny heart for a tall skinny box, etc. They are glued in place when they are finished. That’s it – there’s nothing quite like a homemade Valentine card.
Read more »

Tuesday, December 7, 2010

Mosaic CD Picture Frame

Looks like mosaic glass, right? It’s actually just an old CD cut up and glued to a wooden frame and painted with green metallic paint.
Read more »

Friday, November 26, 2010

Homemade Christmas Card

There’s nothing like a homemade holiday card. I tried this method to make a quick “quilted” card that didn’t actually call for any sewing.
Read more »

Thursday, October 21, 2010

Halloween Monster Gloves

OK, so maybe this is more craft than art, but Halloween can be a great time to challenge your creative muscles. And if I could inspire even just one person to make something instead of buying that awful ready-made stuff in stores, I will be a happy camper.
1. The key is finding fake fur from fabric stores that matches the color of some knit gloves. I think that all black or all white are the easiest to look for. I cut the largest square of fur possible for the top of the glove, and hand-stitched in place. I think you could glue, but would need to put some kind of divider inside the glove to keep both sides from gluing together. If you really want to get "hairy", also add a small strip on the top of the thumb.
2. Once the fur is on, you need some stiff craft felt in the color of your desired fingernails. These are cut out and glued on also, taking care to keep the glue just on the top of the glove. Try making the nails really pointy for an extra scary look!
Read more »

Thursday, July 22, 2010

Another Popsicle House

I’m still loving these little popsicle sticks, and made a variation of my other house project I posted here. This one has a more vertical, paneled look instead of the horizontal, log cabin look.
1. These little popsicle sticks I found at JoAnn Fabric’s, and are about 2 1/2" long. I started by lining up six sticks, and cut the ends off of two more so they could be glued to the back without showing as shown in diagram 1.
2. The roof starts with a frame as shown in diagram 2. Let dry.
3. Cut progressive ends off three more sticks so they can fill in the roof as shown. Let dry.
4. Glue and attach roof to house as shown and let dry.
Read more »

Monday, July 19, 2010

Recycled Mosaic Picture Frame

I love the look of stone mosaic art, but it is expensive and not really practical for young kids. I thought I’d try a variation of this idea I saw online using old plastic cards instead. Between gift cards, rebate cards, and club cards, it’s pretty easy to collect these without really even trying.
1. I started with 8 jumbo popsicle sticks, and glued them together with white glue as shown. Let dry.
2. Cut several plastic cards with a scissors into strips that are just a bit thinner than the width of the stick. Cut across the strips to make the most even and equal-sided squares that you can. Glue these onto the frame with white glue, leaving a small amount of space on either side.
3. If you like the frame with the round ends showing, stop and find or make some art for the center. I wanted a more modern look so after the squares were dry, I used a large scissors to cut the ends off flush.
4. Fill your frame with a photo, drawing, or your favorite quote. To hang, apply a stick-on hanger (available at most craft stores) on the back.
Read more »

Friday, July 16, 2010

Popsicle Stick Log Cabins

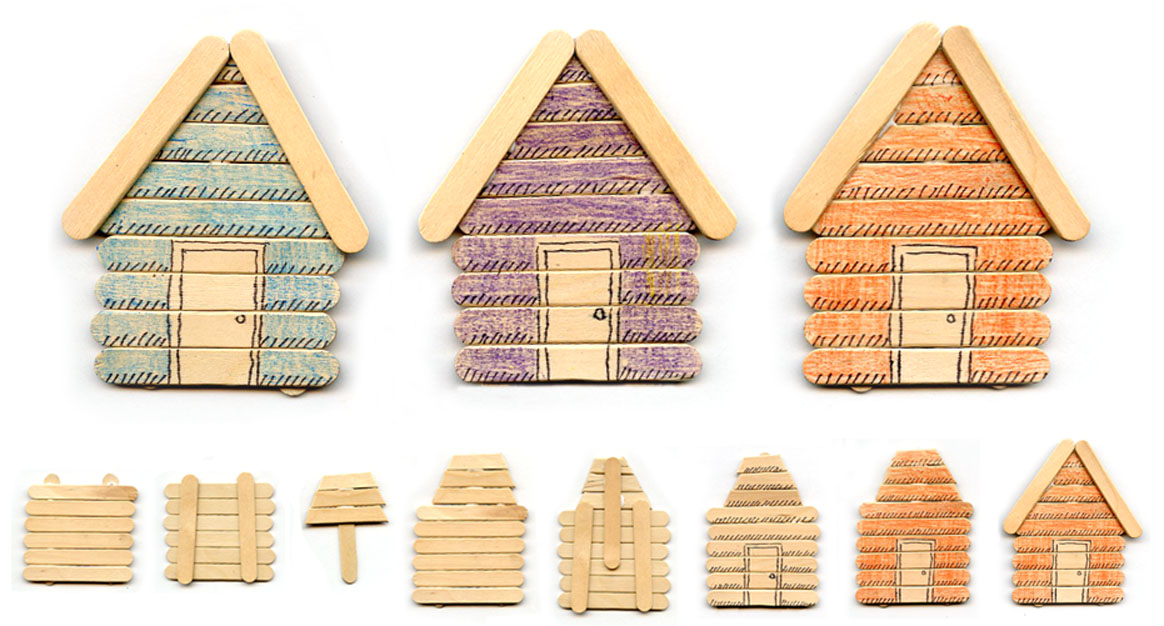
These new little popsicle sticks (they’re 2 1/2" long) that I found at Michael’s remind me of my parent’s log cabin in Tennessee. Here’s one way to make little houses that could serve well as colorful refrigerator magnets. Or add some snow and a string for a holiday decoration? Let your imagination see what it can come up with.
1. Follow the steps shown in my small diagram above. I like using Aleene’s Tacky Glue to connect all the sticks as it is thicker and seems to set up faster. Start by gluing 6 sticks onto two, and try to make the bottom edge flush and the top with a bit of stick still showing.
2. Cut three pieces at an angle as shown, and glue to another stick. I used a heavy scissors and it took a lot of pressure, so I wouldn’t advise that kids try to cut this.
3. Glue the two sections together and let dry.
4. With an Ultra Fine tip black Sharpie, draw some details on the front of the house.
5. Use a crayon to color the front of the house.
6. Glue the final two roof sticks on top. Glue magnets on the back, if desired.
Read more »

Wednesday, July 14, 2010

Mosaic CD Coaster

I found this great idea over at Mini Matisse, who got it from an organization called ArtStart. I love how the plastic case makes a nice sturdy frame to work with, and the clear closure lets you just admire the colorful beans when you are done.
1. Several varieties of dried beans are needed, just test them first to see they are not thicker than the CD case before you start to glue. With a standard CD case open and the tray removed, I used a flat brush to spread a generous line of Mod Podge around the outside edge of the case. I lined up one row of beans on this, pushing them against the lip to make a straight line. The 1/2" or so where the spine used to be needs to be left clear though as the front of the case will not cover it up when closed.
2. After the outside row was complete, I painted another line of glue inside it, and lined up another row of beans. I found that this process of working from the outside in really seemed to help control all these wiggly little round shapes. I made a total of four rows or rectangles before I just filled in the remaining center with glue and the smallest beans.
Read more »

Sunday, June 27, 2010

Japanese Wind Sock Puppet

I found this project at “That Artist Woman” blog, and love how it made very batik-looking fabric, which usually takes hot wax and expensive dyes. This uses washable Elmer’s glue and just acrylic paint, which makes it totally safe for kids. Thanks so much for idea Gail!

SESSION ONE
1. I gave each student a white posterboard (22" x 28") that already had the sections shown above drawn in pencil. They students were to draw their own eyes, scales, etc. in pencil, and then trace everything with a thick black marker.

2. IMPORTANT: You need to tape a layer of wax paper over the posterboard, and then place your matching size rectangle of muslin on top. If you don’t, the fabric may end up really sticking to the poster. The cheap kind of muslin ($2/yard) is all that is needed. The black lines should show through the wax paper and muslin. Each student uses a bottle of Elmer’s Washable Glue Gel to trace all the lines. This needs to dry for at least a day or more until the glue sets up.


SESSION TWO
3. Using just the cheapest acrylic paints possible, have the students paint their fish in whatever colors they desire, making sure to paint over all the glue lines. Layering of paint works well too. Let the dry completely.

4. I removed the muslin from each board, and soaked in hot water for about 15 minutes. A little bit of soap and hand scrubbing removed the top layer of paint and all the glue, which kind of just turned to jelly. Smooth out and hang dry.


5. Fold the fabric in half lengthwise and cut. With right sides together, stitch all around, leaving a 1/2" opening, 1/2" down from the top on each side. Trim seam and turn right side out.

6. Fold over an inch of fabric on the open end and stitch to make a 1" casing. Using 16 gauge wire (or less), and a needlenose pliers, make a small loop on one end of the wire. Slip it into the inside seam opening, and continue feeding it in until it makes a complete circle. Overlap the ends about a 1/4" and cut. Slip cut end of wire into loop and wrap around with the pliers to secure.

7. For final assembly, hook one paper clip around the wire in each of the two seam openings. Take an 18" length of string and tie each end to a paper clip. I used 1/2" dowels for my sticks, and notched a groove in one end so that the string would not slide off. Find the center of the tied string, and make a slip knot over the rod. Hang your fish in a windy spot and enjoy!
Read more »

Monday, June 7, 2010

Father’s Day Popsicle Pencil Holder

Popsicle sticks have a warm wooden, eco-friendly look and are really inexpensive too. I’ve created a project that uses your average 15 oz. tin can as a base, and my own invention of how to make a removeable band of popsicle sticks.
1. I started with two thick wooden rulers and taped them down to a cardboard base. I left just enough space in between for a row of popsicle sticks to lie flat. I placed 25 sticks that were all touching side by side, and then glued down two fabric ribbons with some craft glue.
2. Let dry for about 15 minutes so that the sticks and ribbon are mostly bonded together. Carefully pick up the row of sticks with the ribbon and let dry for at least an hour.
3. One side of the ribbons gets trimmed flush with the stick edge, and the other is trimmed down to about an inch. Glue those ends to the inside of the opposite side and secure with a paper clip until it is dry.
4. Paint an empty, clean 15oz. can and let dry. The popsicle band should slide right over the can. A ribbon may be added for decoration. I like this one from the Martha Stewart collection found at Michael’s.
Read more »

Friday, June 4, 2010

Father's Day Stamp Box

Father's Day art projects always seem harder to find for me than Mother's Day, but I like this simple stamp collage box project.
1. I wish I had a giant stamp collection to make art with, but in lieu of that I found some photography on the internet and made duplicate color prints. Print enough to have a dozen or so per student so they can pick and choose their favorite. I also purchased some of the simple wooden boxes available at Michael's, most of which cost about 99¢.
2. Have the students cut out the stamps they want very close to the edge.
3. I've found that the trick to decoupaging paper without any bubbles is to coat both sides with Mod Podge (meaning the box and the back of the stamp) and press together with a brush. Press firmly and coat the top of each stamp with Mod Podge too. Repeat until covered, taking care to wrap some around the edges to cover as much of the box as possible.
4. Let dry completely and finish with a final layer of Mod Podge.
This is a great box for any guy to store all that pocket change they always seem to have.
Read more »

Thursday, June 3, 2010

“I Love Ewe” Father’s Day Gift

A box of twisty ties at a restaurant supply store inspired this project. I was pretty sure that because they were cheap, and easy to bend and glue, something could be made from them. A few (ok, a lot) of experiments later and this curly haired sheep project took form.
1. I had the students count out 11 popsicle sticks to make their boards. I had kinders so I placed the glue on the two back sticks, and let them line up the remaining 9 on top.
2. I gave the students a white paper rectangle that was the width and height the body needed to be. They were to just cut off the corners to make an oval and glue it on the middle of their board.
3. With a pencil or dowel, the students wrapped the twisty ties around it to make a coil, and slid it off when complete. About 15 or so needed to be made, depending on the size of the body. The oval body was then covered with a generous amount of white glue, and twisty coils were placed on it, as close together as possible.
4. The students were given a narrow strip of black paper that they could cut little rectangle legs from, along with a triangle head. White pencil crayons were used to make dots for the eyes. The legs were slid under the body and the head was glued on top of the coils. When dry, a corny message was added with a black Sharpie.
Read more »

Saturday, May 1, 2010

Felt-Covered Journal


This project is good for smaller groups as it requires purchasing a few items, albeit inexpensive ones.
1. Gather or buy chip board and cut to a 6"x9" size, two for each student. Cut 9"x12" drawing paper in half to match the chip board. Place about 1/2" stack of drawing paper between the boards and take to Staples or the equivalent to have wire bound on one side. Have one book made for each student.
2. Cut oversized felt rectangles and pin together to make two sleeves for the book. Show the students how to make a whip stitch around the cardboard edges with colorful embroidery floss. When complete, pin and stitch the two sleeves together on the binding edge.
3. Using the felt scraps, show the students how to cut out decorative shapes and attach with fabric glue.

Read more »

Friday, April 16, 2010

Pipe Cleaner Dolls

This doll-making project can be a good introduction to hand sewing.
1. The head is made from a 1" diam. wood ball that has a center hole. Fold a large pipe cleaner in half and insert through ball so that loop sticks out of one end.
2. Gather a small bunch of doll hair and stick it through the loop so that it is centered on the head. Pull the pipe cleaner down so that the hair is pulled snugly to the ball.
3. Twist the pipe cleaner together so that it becomes the spine of the doll. Fold another pipe cleaner in half, twist to make it strong, and wrap it around the spine to make the arms. Fold one last pipe cleaner in half, twist, and wrap to the bottom of the spine to make the legs. Embroidery floss is wrapped around the legs and arms to secure the folds and add color.
4. Give students lots of felt, heavy sewing thread and a needle and let them design an outfit for their doll.
5. Permanent markers may be used to draw facial features.

Read more »