Total Pageviews

Showing posts with label popsicle sticks. Show all posts

Sunday, March 20, 2011

Mission Drawing on Popsicle Sticks

I just found that one of my favorite discoveries, dry wax paper, also works with colored pencils. This means that white pencil crayon is now a color option, which is vital for an authentic looking mission drawing. This particular facade is always popular with my 4th graders, so I’ve made a worksheet (download HERE) to help students recreate their own.
1. Students get 9 jumbo popsicle sticks and glue together a board as shown. It is set aside to dry.
2. Students each use their worksheet to draw a mission in pencil.
3. A 6" square of dry wax paper is taped over the top of their drawing, and is traced with a thin, permanent marker.
4. The drawing is colored in with colored pencils. The white in particular needs to be colored heavily so that it has some impact when complete.
5. The drawing is cut out close to the box line. A mixture of 50/50 white glue and water is made and is generously spread all over the popsicle front and drawing back. The drawing is placed face up on the board, spread with more glue mixture, and smoothed with fingers to prevent air bubbles. Let dry and spray with glossy finish, if desired.
Read more »

Thursday, July 22, 2010

Another Popsicle House

I’m still loving these little popsicle sticks, and made a variation of my other house project I posted here. This one has a more vertical, paneled look instead of the horizontal, log cabin look.
1. These little popsicle sticks I found at JoAnn Fabric’s, and are about 2 1/2" long. I started by lining up six sticks, and cut the ends off of two more so they could be glued to the back without showing as shown in diagram 1.
2. The roof starts with a frame as shown in diagram 2. Let dry.
3. Cut progressive ends off three more sticks so they can fill in the roof as shown. Let dry.
4. Glue and attach roof to house as shown and let dry.
Read more »

Monday, July 19, 2010

Recycled Mosaic Picture Frame

I love the look of stone mosaic art, but it is expensive and not really practical for young kids. I thought I’d try a variation of this idea I saw online using old plastic cards instead. Between gift cards, rebate cards, and club cards, it’s pretty easy to collect these without really even trying.
1. I started with 8 jumbo popsicle sticks, and glued them together with white glue as shown. Let dry.
2. Cut several plastic cards with a scissors into strips that are just a bit thinner than the width of the stick. Cut across the strips to make the most even and equal-sided squares that you can. Glue these onto the frame with white glue, leaving a small amount of space on either side.
3. If you like the frame with the round ends showing, stop and find or make some art for the center. I wanted a more modern look so after the squares were dry, I used a large scissors to cut the ends off flush.
4. Fill your frame with a photo, drawing, or your favorite quote. To hang, apply a stick-on hanger (available at most craft stores) on the back.
Read more »

Friday, July 16, 2010

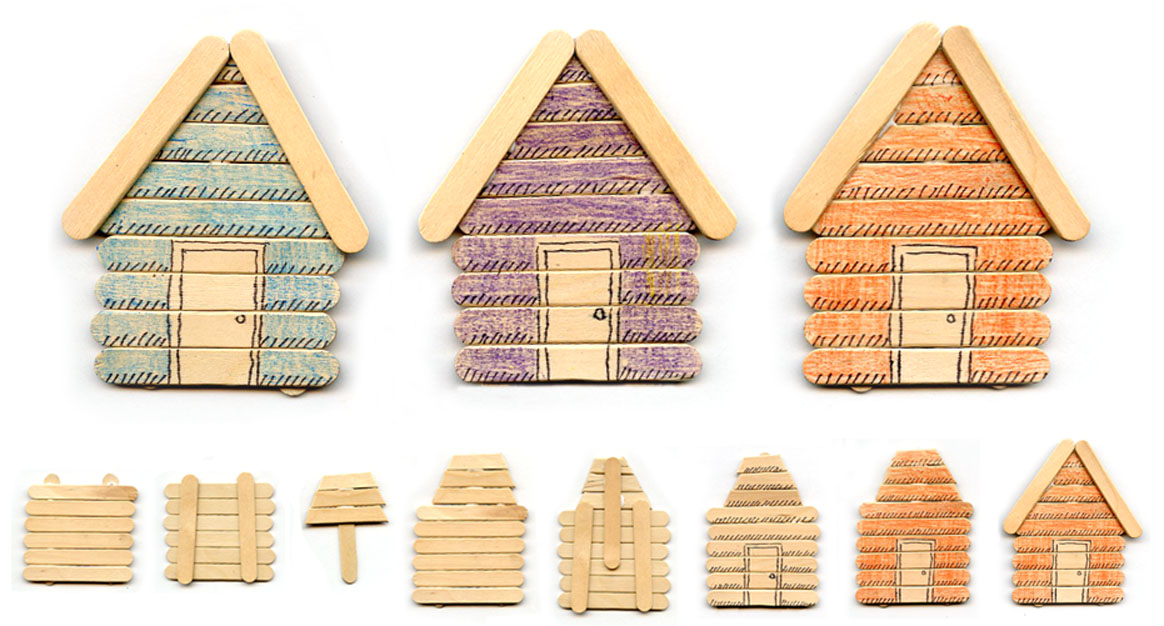
Popsicle Stick Log Cabins

These new little popsicle sticks (they’re 2 1/2" long) that I found at Michael’s remind me of my parent’s log cabin in Tennessee. Here’s one way to make little houses that could serve well as colorful refrigerator magnets. Or add some snow and a string for a holiday decoration? Let your imagination see what it can come up with.
1. Follow the steps shown in my small diagram above. I like using Aleene’s Tacky Glue to connect all the sticks as it is thicker and seems to set up faster. Start by gluing 6 sticks onto two, and try to make the bottom edge flush and the top with a bit of stick still showing.
2. Cut three pieces at an angle as shown, and glue to another stick. I used a heavy scissors and it took a lot of pressure, so I wouldn’t advise that kids try to cut this.
3. Glue the two sections together and let dry.
4. With an Ultra Fine tip black Sharpie, draw some details on the front of the house.
5. Use a crayon to color the front of the house.
6. Glue the final two roof sticks on top. Glue magnets on the back, if desired.
Read more »

Thursday, July 1, 2010

Louise Nevelson Found Sculpture

Louise Nevelson was a creator of wood assemblages made from found objects doused in paint. She worked hard to get recognition in the mostly male art world, but wished to be seen as more than just a ‘woman artist’.
1. I glued the basic square as shown ahead of time for the young students to keep things sturdy. Give each student white glue and enough sticks to fill in the box as shown to make a flat board.
2. Collect a bunch of small items (like buttons, paper clips, puzzle pieces, etc.) that have different shapes and textures and have the students glue them down with generous amounts of white glue. Let dry overnight.
3. If you have the budget, paint heavily with white or black acrylic paint so the art has a shine when complete. If not, tempera paint will work too, you just may need more coats to block out color below.
Read more »

Monday, June 7, 2010

Father’s Day Popsicle Pencil Holder

Popsicle sticks have a warm wooden, eco-friendly look and are really inexpensive too. I’ve created a project that uses your average 15 oz. tin can as a base, and my own invention of how to make a removeable band of popsicle sticks.
1. I started with two thick wooden rulers and taped them down to a cardboard base. I left just enough space in between for a row of popsicle sticks to lie flat. I placed 25 sticks that were all touching side by side, and then glued down two fabric ribbons with some craft glue.
2. Let dry for about 15 minutes so that the sticks and ribbon are mostly bonded together. Carefully pick up the row of sticks with the ribbon and let dry for at least an hour.
3. One side of the ribbons gets trimmed flush with the stick edge, and the other is trimmed down to about an inch. Glue those ends to the inside of the opposite side and secure with a paper clip until it is dry.
4. Paint an empty, clean 15oz. can and let dry. The popsicle band should slide right over the can. A ribbon may be added for decoration. I like this one from the Martha Stewart collection found at Michael’s.
Read more »

Thursday, June 3, 2010

“I Love Ewe” Father’s Day Gift

A box of twisty ties at a restaurant supply store inspired this project. I was pretty sure that because they were cheap, and easy to bend and glue, something could be made from them. A few (ok, a lot) of experiments later and this curly haired sheep project took form.
1. I had the students count out 11 popsicle sticks to make their boards. I had kinders so I placed the glue on the two back sticks, and let them line up the remaining 9 on top.
2. I gave the students a white paper rectangle that was the width and height the body needed to be. They were to just cut off the corners to make an oval and glue it on the middle of their board.
3. With a pencil or dowel, the students wrapped the twisty ties around it to make a coil, and slid it off when complete. About 15 or so needed to be made, depending on the size of the body. The oval body was then covered with a generous amount of white glue, and twisty coils were placed on it, as close together as possible.
4. The students were given a narrow strip of black paper that they could cut little rectangle legs from, along with a triangle head. White pencil crayons were used to make dots for the eyes. The legs were slid under the body and the head was glued on top of the coils. When dry, a corny message was added with a black Sharpie.
Read more »

Sunday, September 13, 2009

Clothespin Horse

Even though this little horse looks simple, it takes a bit of finessing to make the legs stand and to clip all the pieces together. Gluing in stages should help reduce any frustration.
1. I started with a couple of jumbo popsicle sticks and cut out two 3" strips. These were overlapped just a bit and glued together to make the belly.
2. Next I cut a round end about 2.5" long for the neck, and a strip about 1.5" long for the head. These two were glued together, and a little ear was added on top.
3. For the tail, I found some of the thinnest sticks and cut them with the grain to make some long irregular shapes.
4. Open the clothespins to clip onto the belly. Add the head in the front and tail sticks on the back. Glue all in place if you don’t want your horse to become a pile of sticks!

CA Visual Arts Standard: Grade One
2.5 Create a representational sculpture based on people, animals, or buildings.
Read more »