Total Pageviews

Showing posts with label markers. Show all posts

Tuesday, May 3, 2011

Metal Tooling Mother’s Day Card

Gold metal tooling is great material for making textured art. Add Sharpie markers and you have a very expensive looking Mother’s Day card.
1. Each student gets a 3" x 5" piece of gold tooling, and place it on a few layers of newspaper. They draw firmly with a dull pencil to engrave the image.
2. Sharpie markers are used to color it in.
3. The final art may be mounted on a 6" x 9" folded card using double-sided tape. I recommend a quality card stock because this card is a keeper.
Read more »

Tuesday, April 12, 2011

Maasai African Portraits

The Maasai people of African are located in Kenya. Their distinctive clothing and head dress make them among the most well known of all African tribes. A marker drawing on a piece of madras pattern tissue paper is one way to pay tribute to their fascinating culture.
1. After discussing a bit about the Maasai, I recommend that students first draw their portraits on a piece of drawing paper. Beginning with a large oval and neck, the stylized eyes, nose and mouth are added. Neck ware, headbands and feathers may be included too.
2. After the drawing is done, a matching size piece of madras pattern tissue paper is taped on the front, and the portrait lines are traced onto the tissue. Next the lines are all traced with Sharpie markers, some with fat and some with thin tip. I find that a variety of line weights add interest to artwork.
3. Lastly, the face is filled in with marker, leaving a bit of space around the eyebrow and nose line so they don’t disappear.
Read more »

Wednesday, March 2, 2011

Dr. Suess Day Decorations

Our school had a Dr. Suess celebration, and with our modular classroom set up in California, we have a lot of long outdoor halls without much signage. I had students make up their own signs to help visitors while adding color and creativity to our school.
1. I started with large sheets of white foam core, and chopped it into approx. 6" wide strips with an old paper cutter. Two more chops made one pointed end.
2. Each student got their own blank sign, and a lot of Sharpie markers to color with. I discussed the purpose of graphic design for a bit, emphasizing that signs are not just about making them pretty, but making them readable. Large letters and contrasting colors were always a good way to go.
3. When the signs were done, I slip knotted two rubberbands together, and had the open loops go around our poles and then over the sign ends. Works like a charm and no wind has yet to blow them down!
Read more »

Wednesday, January 19, 2011

Art Journaling 133

I’m so excited that I found a new combination of art supplies that I really like. This is made with 2" magazine circles, Sharpie markers and a glue stick, that’s it.
1. Craft stores have lots of circle punch tools, I like this one. I was able to cut through about 5 magazine pages at a time, creating a large pile of circles for the students to choose from.
2. Students chose their favorites, arrange...
Read more »

Tuesday, December 14, 2010

Draw a Christmas Ornament Card

I made this Christmas ornament drawing using a set of fine tip markers. If you draw the edges of a shape lightly in pencil, fill in the inside with lines, and then erase the outside pencil, the look can be rather sophisticated.
1. Lightly draw three straight lines of various lengths from the top of the card, and then add the outer shapes of an ornament.
2. Fill in little circles for the chains, add sets of horizontal lines and shapes to fill each ornament. Erase all pencil lines.
Read more »

Wednesday, November 24, 2010

Abstract Snowman Card

I needed a simple and quick card project, and was inspired by some stock snowman art. After deliberating on all my options, I settled on using Sharpie markers to get the brightest color for the least amount of cost.
Read more »

Wednesday, October 27, 2010

Day of the Dead Skull Drawing

Day of the Dead is a holiday celebrated in Mexico and Latin American on Nov. 1st and 2nd. The holiday focuses on gatherings of family and friends to remember friends and family members who have passed on. I like how the festivities include lots creative imagery with patterns. This project was inspired by a Day of the Dead postcard which featured a very patterned skull drawing.
1. In order to get the students drawing their patterns as soon as possible, I made cardboard templates of skulls for them to trace with a pencil on a black piece of paper. I reminded them that when they drew their eyes, they should be in the middle of the head, sitting on a imaginary line across the center, not up in the forehead. The triangle nose is halfway down, and the mouth halfway down again. I find you can’t remind students often enough about these feature placements. There is just some natural tendency for some to draw their eyes up in the top half of the heads.
2. Once the features were in their correct place, I gave each student a silver Sharpie marker and had them trace their lines. They could then draw in whatever patterns they wanted, I just stipulated that all shapes must be balanced to make the drawing symmetrical. If they drew a flower on a left cheek, they had to draw the same flower on the right. I think this is a good introduction to symmetry for those as young as first grade. Older students can get the idea reinforced,
3. The students were instructed to fill the face with as many symmetrical shapes as possible. When spaces got smaller, they could make lots of circles, and when the spaces were smaller still, they could fill them in with dots.

CA Visual Arts Standard: Grade Four
2.2 Use the conventions of facial and figure proportions in a . . . study.
Read more »

Friday, October 15, 2010

Designer Wallpaper Skulls

I recently received a large wallpaper donation at my school, and have decided to show the students how to cut out “designer” skulls.
1. I will give the students a sheet of wallpaper approx. 8.5" x 11". They are to fold it in half the long way, and draw 1/2 of a skull on the fold, making it as large as they can in both directions. The skull is basically an oval head with a narrow chin.
2. With the skull still folded (right sides together) they draw one eye halfway down the skull, half of a triangle nose, and half of some shape of mouth. These shapes are all cut out, still on the fold. For the eyes, I just cut straight over to the eye, and then around it. The slit that was made disappears when glued down.
3. The skull is glued down to a sturdy piece of white paper with a glue stick. I want the students to then color in the background of the skull with Sharpie makers, repeating any of the design elements they see in the paper.
Read more »

Thursday, August 19, 2010

Kinder’s First Art Project

I’m guessing that as an art teacher I’m not the first to overestimate, from time to time, the abilities of my students. I’m never more aware of this than when new kinders come to my art room at the beginning of a school year. Some are semi-prepared from preschool, but some are not. So as much as I want to dig in at first with some beautiful new project, I’ve learned that the first class just needs to be super, super simple.
1. Kinders in CA spend much of the year studying patterns, so this blends well with their curriculum. I spend a few minutes talking about all the ways that lines can make patterns (round, square, zigzag, etc.) and then draw some examples on the board. The students are all given a thick black marker and five strips of construction paper about 2" x 8" wide. They are asked to draw a different line pattern on each. No coloring in is allowed, only lines.
2. When the patterns are done, they get a sheet of black construction paper, about 9" x 15" or so. After instructions on how to use a glue stick, they glue the strips to the black paper. It helps to start at the top and work down, leaving some space in between. As more than one kinder teacher has taught me, it’s important that these new students have a successful experience their first time around in the art room. It’s worth it at this point to focus on the process and not so much on the product. The masterpieces can all come later. :)
Read more »

Wednesday, August 11, 2010

Frank Stella Abstract Drawing

Frank Stella is an American painter and printmaker who has fully embraced the idea that sometimes a painting can just be a flat surface, with no intention of having any depth to it. In the 1960s he created some paintings titled the “Protractor Series” which you can see HERE. For young students practicing geometric drawing, a protractor is the perfect tool to work with.
I like working with coated paper and Sharpie markers, so that is how I created this artwork. The pointy tips on the markers take some patience to color solid areas, so if I had young students (1st through 3rd grade) I would use some blunt tip markers and drawing paper. I’ve also found that limiting the amount of markers students may use (6 or 7?) forces repetition, which can create a kind of color rhythm in their art.
1. Every student will need a protractor and Sharpie, and should make overlapping shapes all over their paper. I would limit them to 6 or so protractor tracings, and that they all need to be either horizontal or vertical. Stella’s art is not freeform or random looking. It’s very clean and orderly and geometric, so that is the look the students should have as a goal.
Read more »

Monday, August 9, 2010

Back to School Decorated Pencils

Here’s one quick way for your kids to get creative and personalize their back-to-school pencils. I just pulled out my handy-dandy stash of Sharpies and tried a few different looks: animal skin, flowers and stripes. I’m sure kids could think of many more. Fish scales? Reptile skin?...
1. You may have read on my “Favorite Supplies” list that I prefer Ticonderoga pencils to almost any other brand. Others are often made off-center, or have wood that chews up in a sharpener, or lead that is too light. I like the quality of these, plus the nice yellow color is a good base to work with. The one coloring tip I can offer is that it helps to put your pencil on a little ledge of some kind (I used a book) so that one end can extend over. When coloring with the Sharpie, try to rotate the pencil in the air as you color so that the marker has a few seconds to dry before it touches the paper. The color does set up fast, but if you touch it right when it’s still wet, it will smudge. To make the leopard skin look. I started by making lots of brown spots all over, and then drawing black “C” shapes or “O” shapes all around them.
Read more »

Wednesday, May 26, 2010

Gold and Black Greek Vases

My quest for multi-cultural art continues, which has led me to a new media combo that I really like. It’s using food wrap paper like this, markers and tempera paint. I actually ran out of drawing paper and tried out this food wrap that was left over from an old project. It makes for a very “breezy” painting that doesn't wrinkle like the others. More tests to continue...
1. I had the students fold their 12" x 12" food wrap paper in half and crease. With a pencil, they could draw half of a large vase, preferably using up as much of the paper as possible. When complete, they traced it with a large, chisel-tip black Sharpie. With the paper still folded, they turned it over to see the lines showing through and traced again. When complete, the opened vase drawing should be symmetrical.
2. They students filled in their vases with decorations of the country, with either figures or plants. I asked them to draw lots of images, trace them carefully with the black Sharpie. Once completed, the negative space around them could be filled in black. The tops, handles and base could be colored or not at their discretion. Care needed to be taken to not rub hands through the marker while it was still wet as smears could occur.
3. When the vase was all colored in, gold tempera paint was spread over the entire vase, but not the background. I had thirty 5th graders do this today in 45 minutes, all with really bold and shimmery finishes. Can’t wait to see them hanging on a line outside the classroom tomorrow.
Read more »

Tuesday, May 18, 2010

Delaunay Marker Drawing

Sonia Delaunay was a ground-breaking female artist who made some wonderful abstract paintings known for their rhythm and color. My goal was to have the students learn that if they used repeating shapes and colors in their art, they could create a very rhythmic picture too.
1. I found a vital piece of equipment at Michael’s, a circle scissor that helped me make dozens of circles from 1" to 6" wide out of card stock paper. I passed out both the inside and the outside circle shapes to trace, along with a ruler. The goal was to have a picture filled with shapes that are limited to full circles and half circles, but no other kind of splices. The best way to control this is to ask the students to trace one large circle and one smaller one in any placement on their paper. A center dot is drawn in the middle of each.
2. With a ruler, the student is to draw a line through the center dots.
3. More circles can be traced and added inside and out, but always centering them to the best of the student’s ability.
4. We used good old Sharpie markers for coloring, and I had the good fortune of having some coated white paper on hand. It really made the markers glide on, but I bet that regular paper would look just as nice. Remind the students that they are to have repeating colors. Each marker should be used in at least 3 different places. I personally love how these drawings came out – wish I could make giant posters out of them!
CA Visual Art Standard: Creative Expression, Grade Four
2.6 Create an original work of art emphasizing rhythm and movement....
Read more »

Monday, May 17, 2010

Scherenschnitte-style Drawing

Scherenschnitte, which means “scissor cuts” in German, is the art of papercutting. This work often has lots of symmetry, and common forms include silhouette and portrait images. I needed a German-themed art project this week, so I had my 4th graders draw a bold German mask to imitate the look of Scherenschnitte, as sharp scissors or knives were not an option for this age group.
1. One of my biggest internet finds last year was ClipartETC.com. They have thousands of etching-style drawings that are very easy to browse through. I decided to use several of their German mask images, like this one, and printed the largest out on a letter-size paper. Because the mask images tended to have shading on one side and not the other, I asked this students to fold the paper in half, leaving the unshaded side of the mask showing on the top. 
2. The students placed a sheet of tracing paper on top of the folded paper and drew in pencil half of the printed mask by tracing all the edges they could find.
3. When the half-mask drawing was complete, the students refolded their tracing paper so that the pencil was on the inside, and they could trace the other side of the face on the blank half of the paper. The goal was to have a symmetrical face drawn on the tissue paper, even if the pencil lines did not end up on the same side.
4. When a symmetrical face was showing on the tracing paper, a large black Sharpie was used to trace all the lines, making them as thick as possible. The thicker the better, to imitate the look of cut black paper that was cut away with a blade.
5. When the mask drawing was complete, a frame was added around the outside, one that touched all four edges of the drawing.
Read more »

Sunday, May 16, 2010

Mandala Drawing on a CD

A mandala is an abstract design that is usually circular in form. In fact, “mandala” is a Sanskrit word that means “circle”. Mandalas generally have one center point from which radiate an assortment of shapes and designs. Radial symmetry is the cornerstone of any mandala design.
1.  I wanted to start with a bright background on my old CD, so I spray painted it white until it was totally opaque. After it was dry, I brushed it with some watery glue to make a more slippery surface. I learned that would help keep my markers from plugging up later on.
2.  After the glue was druy, I used a ruler and pencil to kind of estimate lines that would divide the CD into 8 equal sections. (I plan to give my students templates to trace to help them make straight, even lines.) I drew a line through the middle of the CD to split it in half, then another perpendicular to it to make 4 equal sections. Lastly I make marks around the center hole at what looked like the middle, and drew a line through it to make what looked like 8 pretty even sections.
3. Starting with just one section, I drew simple diamonds, circles, leaves and curves to fill it up. When complete, I repeated the shapes in the same manner until all 8 sections matched each other. After the pencil lines were done, they were all traced with a fine tip black Sharpie marker. Lastly, the shapes were all colored in with Sharpie markers, taking care to keep the colors all symmetrical. 
CA Visual Arts Standard: Grade Two
2.5 Use bilateral or radial symmetry to create visual balance.
Read more »

Wednesday, March 24, 2010

From Geometric to Organic

This is a fun and easy project that shows how you can turn geometric shapes into organic ones.
1. You could have students draw a set of triangles, circles and squares, but I found it easier to have cardboard templates to trace. This keeps students from trying to draw the perfect shapes themselves, which can sometimes slow things down. Ask them to trace several shapes on their paper, some preferably overlapping. Important note: they need to leave some white space, they should not fill in the entire paper.
2. After the pencil shapes are drawn, they are to be colored in with a NON-permanent, waterbase marker. This is the time to use those cheap, fat store markers as you actually will be wanting the colors to bleed.
3. Pass out small cups of water and show the students how to drop several puddles on their artwork with a brush or dropper. If they pick up the paper and roll the water around a bit, it should start to make lots of colored streaks and blobs. Repeat this until almost all of the artwork is filled with wiggly colored lines. Let dry overnight.
4. Now comes the fun part, taking a thin black Sharpie and tracing all the organic shapes that were made from the running water. The students need to work slowly to trace all the wonderful edges they see, both inside and outside the colored shapes. The more time they put into the tracing, and the more detail they see, the better their artwork will look.
Read more »

Sunday, March 21, 2010

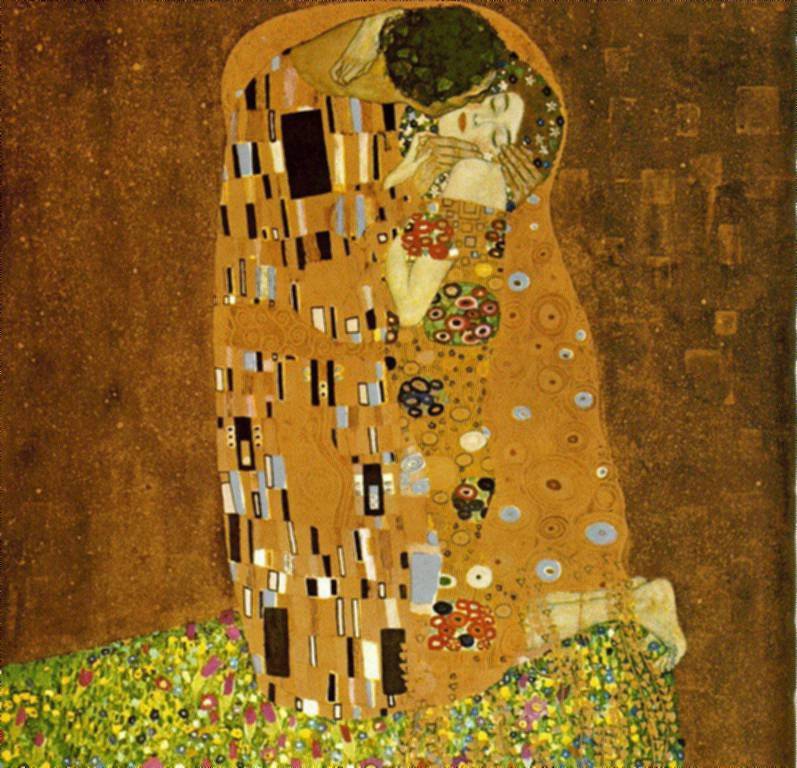
Gustav Klimt Drawing

An Austrian painter, Gustav Klimt lived in the early 1900's and started his career as a decorator. He is probably most famous for his painting named "The Kiss".
1. The first step is to give the students black construction paper, magazines with lots of people in them, scissors and a glue stick. Instruct the students to look for a person in the magazine that has exposed arms. They are to cut out the head and arms as three separate pieces.
2. The body parts will then be arranged on the black paper in the same manner they were in the magazine. Have the students carefully glue these down with a glue stick.
3. The fun part! You'll need some gold paint markers, which are not cheap, but they are SO fun to draw with. Explain again to the students that Klimt was considered a master at both decorating and painting and they are to fill in their person with an amazing, over-the-top piece of clothing and then lots of pattern all around the background until there is no more room. NOTE: The paint markers are not rated safe for young children. Use at your discretion with students that you trust will not stick them in their mouth or give classmates gold manicures.
Read more »

Saturday, March 20, 2010

Butterfly Specimen in a Box

I was inspired by a painted butterfly over at Genine’s Art Blog, and simplified the look for kids with Sharpie markers and an origami box.
1. I started with an 11" square of white cover stock paper to make my box. Click on diagram below.
2. I made my butterfly by folding a 6" x 4.5" piece of white paper in half, lengthwise. I like using any kind of coated paper as the permanent markers glide on so easily. I drew my butterfly profile and cut it out.
3. I opened the butterfly and added the details in pencil trying to maintain the symmetry. I then traced the details in black and filled them in with permanent markers.
4. To mount my butterfly, I cut a strip of foam core small enough to fit behind the body and I taped it to the box. I then secured the butterfly with two small push pins – just like real entomologists do!
CA Visual Art Standard: Creative Expression, Grade Two
2.5 Use bilateral or radial symmetry to create visual balance.
Read more »

Wednesday, March 10, 2010

Andy Warhol Portraits

Andy Warhol's repetitive style is fun to duplicate and the perfect example for students to create their own repetitive drawings using Sharpies on acetate.
1. Review some of Andy Warhol's portraits of Marilyn Monroe, Elvis Presley, etc. Collect several photos of celebrities or of the student's themselves and copy in black and white. Let the student's choose one photo, and give them 3 sheets of acetate and a black Sharpie marker.
2. Ask the students place the acetate over their photos and trace the edges in black. When tracing is complete, the voids can be filled in with colored Sharpies. After one drawing is complete, the students are to make two more, using a variety of colors.
3. Trim the acetate if necessary. Using colorful card stock, cut three paper frames to fit the size of the art. Tape the acetate to the back of each frame. The panels can be posted flat to a wall, or taped together to make a z-fold card.
This sample was made by a 2nd grader.
Read more »

Sunday, January 17, 2010

Art Journaling 119

These umbrellas are cut out from patterned scrapbook paper. It’s raining cats and dogs here in LA so I thought this would be a good theme for my next after-school Art Journal class.
1. I started with tracing different size circles onto the pattern paper, drawing a scallop line through the middle, and cutting each out. I made one large, one medium, and one smaller circle so all my umbrellas would be different sizes.
2. After arranging them on my journal page, I glued them down with a glue stick. Black lines were drawn on each to indicate the spokes, and then handles were drawn underneath.
3. I used a thin blue marker to draw lines of rain coming down, which stopped at each umbrella. Pencil crayon was added to add more color to the background.
4. Most students have heard of the "Rain, rain, go away..." poem, so it is an easy one for them to write somewhere on their page.
Read more »