Total Pageviews

Monday, November 30, 2009

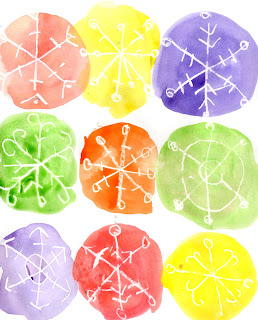
Watercolor Resist Snowflakes

Here's a simple crayon and watercolor painting idea that was inspired by an illustration on a stock art website.1. As the students will first need to draw with a white crayon on white paper, I've found it helpful to trace 9 large circles very lightly in pencil to use as a guide. As a starting point, I encouraged the students to make an "X" in the middle of each circle, and then a horizontal line through the middle so their flake will have 6 legs. After that, they may add dots or arrows to each, but they must press very hard and draw slowly to leave a lot of crayon on the paper.2. Once you are certain that there is a snoflake drawn in the middle...
Read more »

Saturday, November 28, 2009

Stained Glass Nativity Mural

I am proud to unveil my newest stained glass mural design, a nativity manger scene. I love the way the colors stand out against the heavy black edges. Just click on the image if you want to see how the template looks before coloring.This mural has 30 pages to color and is 36" by 60" when complete. It also contains a single page color copy of this sample posted. Students could refer to it if you would like your final mural to look somewhat like mine.You can purchase my pdf file with instructions for just $5. Click the “Add to Cart” button below to make your payment and receive your download instructio...
Read more »

Thursday, November 26, 2009

Line Art Leaves

I tried something new with this project. I told my students that contrary to the popular belief, there was not going to be a prize for finishing first, but rather this time there would actually be a prize for the student who finished last. (Their homeroom teachers usually had some kind of reward system already set up.) It actually worked out well as I saw a lot of slow and careful work being done, especially from those that always seemed to rush.1. I had large tabloid paper and large cardboard stencils of three different kinds of leaves (oak, beech and sassafras.) Each student was asked to trace at least two of their favorite leaves, and then...
Read more »

Tuesday, November 24, 2009

Acrylic Dry Brush Landscape Painting

This lesson was to show young students how to layer color when painting with opaque paints, such as acrylic or tempera. Their tendency is to mix and mix and mix, which only creates a muddy palette. If you put some restrictions in place, the outcome is much cleaner and brighter.1. I had the students paint the bottom third of a horizontal paper white. (This example was done with acrylic, but tempera would work fine too.) Then they chose a main cool color for the sky, as this was to be a winter scene. All the paint needs to be spread thin so that it starts to dry pretty quickly.2. Next, an accent color was added to the sky as small dots of paint...
Read more »

Monday, November 23, 2009

Turkey Coloring Page

Need a quick activity for class or family get-together? Here’s a turkey that I drew (inspired by a stock art illustration again) that can be customized in many ways. Click on the image to get the blank page to print. Happy colori...
Read more »

Saturday, November 21, 2009

One More Turkey Drawing

I’ve found a lot of great drawing ideas over at www.fotosearch.com. If you ever get stuck for new ways of drawing common items, try searching their clip art to see what comes up.1. I started by drawing my turkey on black paper with a pencil. If you want to see the steps, follow the project I have posted here and then add some more details and patterns to the feathers and body.2. Trace all your pencil lines with a white Marvy Opaque Stix. The white is really fun to draw with as the line first seems clear, and then turns bright white after a few secon...
Read more »

Friday, November 20, 2009

Watercolor Still Life

When it comes to painting, most children need to practice looking at subtle changes in color. The skilled student may already see this, but others may have not been asked to think about it before. In this case, they are challenged to make as many values as they can with just one color and a little water. 1. On a chalk board, draw three simple still life shapes: the coffee cup, the wine glass and a bowl. Ask the students to draw all three in pencil on a 9" x 12" watercolor paper, but note that the items MUST all overlap in some fashion. Add a table edge line somewhere in the middle.2. Give each student a single dark crayon for them to trace all...
Read more »

Thursday, November 19, 2009

Turkey Scratch Art Drawing

This scratchy-looking technique is called “sgraffito”, and it works well with drawing something like a turkey with all it’s lines and feathers.1. I made a simple line drawing of a turkey for the students (that you can download here) as they are a rather unusual and complex shape. Have the students trace the lines with a black Sharpie marker to thicken the lines.2. The turkeys are to be colored in with oil pastels. Important: this layer needs to be thick and it really helps to use some very soft oil pastels like the Portfolio brand. I’m not sure that the less expensive ones will work very well as they tend to be harder and not as easy to get really...
Read more »

Tuesday, November 17, 2009

Tempera Turkey Painting

This project uses the same drawing technique that I posted about here, but is drawn in a large format (about 12" x 18") and painted with tempera paint. I let the students finish the feathers in whatever manner they wished – either realistic or with fun patterns. My goal was to have them practice their radial drawing with the feather lines that went out from the body. I compared it to the lines that radiate out from the sun, which most students seemed to grasp, even the 1st grade...
Read more »

Monday, November 16, 2009

Paper Mache Bowls

My after-school paper mache class just finished their bowl project, and I love how they turned out. The key is to just not take any shortcuts. This bowl is made from four mache sessions: two with newspaper and two with paper towels. 1. I have posted the steps to this project before, which you can see by clicking here. I had previously instructed students to do just three layers of mache, but you can see the difference that is made by adding one more layer. I love how thick and strong this one is. It stands about 12" high. This bowl was made by a talented kinder (with a little help from his mo...
Read more »

Saturday, November 14, 2009

Tissue Paper Collage

This is really good for young kids (age 5 and 6) who may not have used a paint brush before. The only catch is finding liquid starch, which I have only found at the Von’s grocery store chain in LA. 1. You can tell the students that they will be making a collage with just warm colors: red, yellow and orange. Give them a few dozen tissue paper squares in these colors, approx. 2" in size. 2. I used a parchment-type paper (wax paper would work too) for the base, and gave the students all a cup of starch and brush. The starch works well because it is thick and not too sticky. Show the students how to brush a little starch on their base paper, and...
Read more »

Thursday, November 12, 2009

Friendship Bracelets

This project was a hit not only with girls but with boys as well. I think they are just “surfer” looking enough to work for both.1. I read somewhere that these bracelets are made with 6 colors, one for each letter in the word F-R-I-E-N-D. I cut about a yard of each color and taped them to the back of a piece of 8.5" x 11" chip board. I then taped the top down with the yarn lying smooth and placed a clip at the bottom. Keeping the yarn snuggly in place while working produces more consistent knots.2. The process of making the bracelet is releasing one yarn at a time from the clip, wrapping a double knot around each successive yarn, and then securing...
Read more »

Lots of Logs Painting

I was inspired by a print at “Geninne’s Art Blog” and turned it into a study using neutral colors. In third grade, students can start to learn about colors that are not on the basic color wheel, like the neutral colors brown, black, white and gray. I like to associate them with nature, so this log painting helps to make that connection.1. Give the students a square piece of paper. They are to draw a square frame near the edge, and lots of circles that fit inside. The goal is to have lots of different sizes, and all of the spaces used up. Tip: the younger the student, the larger the paper should be.2. Using brown, gray and black and white crayons,...
Read more »

Tuesday, November 10, 2009

Rousseau Tiger Drawing

Henri Rousseau was a French artist that lived in the late 1800s. He tried to paint in the schooled manner of the traditional artists, but it was the innocence and charm of his work that won him the admiration of many avant-garde artists such as Paul Klee. 1. If possible, show a poster of Rousseau's “Surprised! Storm in the Forest” painting to the students. Impress upon them that it was Rousseau's loving attention to detail that made him an exceptional artist. Encourage them to do the same.2. Give each student a 9" x 12" piece of paper and a 6" cardboard circle template. Have them trace the circle in the center of the paper.3. Show the students...
Read more »

Saturday, November 7, 2009

Paul Klee Mural

Paul Klee was a Swiss artist (1879–1940) who experimented and eventually mastered color theory. This mural of his famous “Castle and Sun” painting may be colored to match the original as shown here, or just filled in with your student’s favorite colors. My mural has 24 pages to color and measures 43" x 40" when complete.You can purchase my pdf file with instructions for just $5. Click the “Add to Cart” button below to make your payment and receive download instructio...
Read more »

Friday, November 6, 2009

M.C. Escher Tessellations

A tessellation is created when a shape is repeated over and over again covering a plane without any gaps or overlaps. I learned the hard way how easily triangles can get flopped and rotated, so I came up with a numbering process that eliminated that problem.1. Give each student a 3" (or larger) square of heavy card stock paper, scissors, tape, and drawing paper.2. Make a diagram on a board that follows the steps illustrated to the right.a. Number the corners as shown.b. Cut the bottom two corners off and move up to the top. With edges "kissing" and not overlapping, tape in place. The numbers should stay right reading.c. The students are to draw...
Read more »

Thursday, November 5, 2009

Snowman on Skis

I sometimes look at stock illustrations on websites like gettyone.com for inspiration. I found a simple drawing of a snowman on skis that I really liked, and remade with my glue and pastel technique. 1. Drawing lightly on black paper, make three overlapping circles, each getting a bit smaller as they go up.2. Draw simple stick arms, a face and buttons.3. Add stick ski poles attached to the hands, and a hat that sits on top of the head. Stripes are nice as they allow for extra color.4. Draw two skis below the bottom circle, and then a curved horizon line. Trace all lines with a thin line of white glue and let dry for 6 hours or so.5. When dry,...
Read more »

Sunday, November 1, 2009

Close Crop Snowman

Drawing closeup and cropping out what is unnecessary can make just about any artwork more interesting. The tendency is for students to draw small with lots of extra space. If you are trying for dynamic images for special uses like greeting cards, this approach will make a big difference.1. I started with a 9" x 12" sheet of black paper, and traced a ruler width in pencil around the outside to give the artwork a frame.2. I used an old CD to trace the bottom circle, purposely placing it so that it would go off the page on one side. The smaller head circle came from centering a smaller cup above the CD circle. I drew in the face, hat, scarf, arms...
Read more »

Pages 381234 »