Total Pageviews

Friday, April 30, 2010

Polymer Clay Monster Face

Polymer clay is pretty cool stuff to work with. It has this great ability to stick to itself and not fall apart. I’ve used it with smaller size classes with some great results.
1. Each student should get from 6-8 different squares of polymer clay. Start by rolling a large 2" ball, and press it flat to make a base. Next the students are to build up a nose, and added teeth. The ears and hair should be added last, always taking care to keep shapes and colors symmetrical. IMPORTANT: Use baby wipes or the equivalent to clean hands after using polymer clay. It is known to be made of some very unnatural substances that don’t come off with just soap and water.
This artwork was created by my son when he was 8 years old. Mom is proud!
Read more »

Thursday, April 29, 2010

Thick and Thin Trees

This project produced a lot of really nice paintings in my afterschool watercolor class today. It's a bit of a stretch to ask kinders to paint very gentle and curvy lines, but they got the idea at least that tree trunks are thick and branches are thin. Not a bad place to start.
1. I'm finding I can get pretty good prices on watercolor paper if I save up my coupons for Aaron Bros. and Michael's. I gave each student an 11" x 15" sheet and had them draw a yellow sun near the top of the paper with a yellow crayon. They were to press hard to make the sun really show up.
2. Using my dissolved Crayola tablets, the students covered the page with wide bands of color, slightly overlapping to get a little bleed.
3. This step is important as it helps to keep the tree lines clean and without any fuzzy edges. I gave each student a paper towel and had them lay it over the entire painting and press to soak up any wet spots. They repeated this for about a minute to get them as dry as possible.
4. I had saved dozens of black watercolor tablets since I generally use bright palettes.  I dissolved lots of them in just enough water to make black paint the consistency of heavy cream. The gave each student a small cup, along with a medium size watercolor brush. I showed them how to paint gently to get a smooth horizon line and a natural taper to the parts of their trees.
Read more »

Wednesday, April 28, 2010

Art Journaling 128

One of the journal page ideas that I really like is having a pattern of writing in the background of a drawing. With my class full of kinders and 1st graders, I'm finding that they really can't write that much, so starting with a magazine page full of type is a good substitute.
1. I prepped by collecting type only magazine pages, and trimmed them down to easily fit within our journal pages (6" x 9"). The students used ink pens to trace a body template, and then Sharpies to write things around the outside about themselves.
2. When the writing was done, I demonstrated how the students could take watercolor pencils, color a band of color around the body, and then paint with water to make soft edge.
3. When complete, I had some cool colored tape the students could use to attach the art to a journal page.
Read more »

Tuesday, April 27, 2010

Paper Mache Bowl, Part 2

As promised, here is my follow up to yesterday's post. This bowl was made and painted by a very talented kinder, believe it or not.
1. I did a bit of prep work by spray painting the outside bowl with a very quick layer of white spray paint. It wasn't enough to totally cover up the newsprint, just maybe half of it or so. When the students worked with their acrylic paint, it seemed to help keep the colors bright and pretty opaque. They began by generously covering both the outside and inside of their bowls with their favorite color.
2. The last step was to add any detail design. Smaller brushes were available to paint stripes or spots. 
3. After the bowls are completely dry, they are sprayed with a gloss sealer to protect and add a bit of shine. My opinion is that a glossy shine will make almost any project look it's best.
Read more »

Monday, April 26, 2010

Paper Mache Bowl, Part 1

My current afterschool paper mache project is turning out to be one of my most reliable, ye olde balloon and mache combination. I posted this project a while back, but without illustrations. Tomorrow is paint day so I'll be showing off the results.
SESSION ONE: I started each student off with a 12" balloon and a cut-off grocery box to hold the balloon in place. The students used 10" strips of newspaper for the first layer. The mache recipe can be found HERE. The mache requires several days to dry. Warning: Do not sun dry in the sun. The balloon will expand and tear the paper.
SESSION TWO:  If your balloon has popped, cut a small opening and blow up another inside to replace it. A second layer of mache and paper is applied. It helps to do the this layer with a diffent color paper to assure full coverage. Again, let dry for several days.
SESSION THREE: Cut a 7" circle of corrugated cardboard for the base of each bowl and use about 8 long strips of masking tape to secure it as shown. Have the students mache a layer of long newspaper strips to wrap around over the masking tape and cover the bottom to complete the base. Then, add a second layer and let dry for several days.
SESSION FOUR: To prep for painting, I used a  box cutter to open the bowl and then covered the rim with masking tape to reinforce it. Paint away with bright acrylic paint. Check back in to see a sample tomorrow...

Read more »

Sunday, April 25, 2010

Chameleon Watercolor Painting

You can start your lesson by reading Eric Carle’s “Mixed-Up Chameleon”, which gives the students freedom to decorate their reptile however they want.
1. I like to make my own chipboard templates which give students the overall shape, but leaves some detail for them to add. In this case, I gave them the body and tail shape, but left the legs for them to add on. After the students trace the template in pencil, they could draw four legs underneath, and add an eye and tongue.
2. When the body was done, hand out either crayons or oil pastels. I know the pastels are a little messy, but they do make much brighter colors. The students are to trace drawing in pastel, and then add some patterns on the inside of their chameleon.
3. Lastly, give each student liquid watercolors and show them how to gently dip and paint the inside of their chameleons. This can be a good intro to watercolor painting as young kids often think that their art will be covered up if they paint on top. Future resist projects may be easier if they understand this concept first.
Read more »

Friday, April 23, 2010

Torn Paper Kandinsky

Abstract art projects are great for those who feel that art is always about drawing, and may not always be so keen on their skills. Sometimes just making irregular shapes with color can produce beautiful results. These circles are created in the style of Kandinsky's "Farstudie Quadrate".
1. Give the students a horizontal 9" x 12" sheet of white paper. Then offer many colored rectangles (4.5" x 4") for them to choose from. They may select six, and these are to be glued down on the white paper, in two rows of three to make a grid.
2. Lots of additional (4.5" x 4") rectangles may be distributed. The students are to tear (no cutting!) an oval that fills one rectangle. Then they are to tear sequentially smaller ovals that fit inside, at least three ovals in each. As the pieces are torn, they may be glued down with a glue stick. Continue until all the rectangles are filled.
3. When the glue is dried, distribute oil pastels. Ask the students to choose colors that contrast with their paper, and then draw 2-3 ovals in each rectangle.

Read more »

Thursday, April 22, 2010

How to Draw a Laurel Burch Cat

This project was inspired by a talented artist named Laurel Burch, who has now sadly passed away. She developed an abstract style of painting cats that is really fun to imitate.
1. For young students, do a step-by-step drawing session as the diagram shows.
2. After the cat is drawn in pencil, have the students trace the lines with a marker, and add fun patterns to their cat body if they wish.
3. A final coloring with construction paper crayons will complete their picture.

Read more »

Monday, April 19, 2010

Tissue Paper Flag Mural

Can you believe this mural is made out of craft tissue paper? Thanks so much to Krista Dillon and her students who experimented with my Canadian Flag Mural and came up with this beautiful piece! 
The technique is one that I haven't used since elementary school. It's made up of lots of craft tissue paper cut into 2" squares, white glue, and a little patience. Each square is wrapped over the eraser end of a pencil, dipped in white glue and pressed into place. You'll need to trim and tape the templates together first and that's basically it. The closer you place the tissue squares together, the better it looks. Thanks again for sharing this Krista.
Read more »

“I Love to Collage!” Book Giveaway

I found this great book at my local art store, and love some of it’s new collage ideas. Just to name a few: cutting cardboard tubes in half lengthwise to make a horse, making birds from just circles, ironing tissue paper and thread between wax paper to make window art, and more.
To enter my giveaway, just leave a comment and a way to contact you by 12pm PDT Sunday, April 24th. Good luck everyone!
Read more »

Sunday, April 18, 2010

Mini Abstract Mural Set #1


This is a revised version of my Mini Abstract Mural Set #1, now including Delaunay. My mini murals are great for small groups, ambitious individuals or family fun. Click on the image to view the templates and finished dimensions.

You can purchase my pdf file with instructions for just $5. Click the “Add to Cart” button below to make your payment and receive download instructions.
Add to Cart
Read more »

Saturday, April 17, 2010

Watercolor Landscape

Here's a simple watercolor project I tried out last week. It turned out to be a good way to teach the very basics of watercolor, namely that if you paint on dry paper, you get clean lines, and if you paint on wet, you get fuzzy.
1. Working with 11" x 15" watercolor paper, the students first drew along with me in pencil. I asked them to draw a horizon line near the top, and then an upside down skinny "V" to look like a road that disappears into a dot when it goes far away. Curvy roads were also allowed.
2. The areas on either side of the road were going to be fields, so the students were to divide them into about 3 or 4 sections.
3. A simple house was added on top on the horizon line.
4. I gave each student a thin brush and choice of bright liquid watercolors. (I like to dissolve the Crayona tablets in spillproof cups ahead of time.) They were to "draw" with their brushes and paint over all their pencil lines, taking care to make them as neat as possible. When finished, they could dab at their lines to speed up the drying for the next step. This again is an example of "dry" watercolor painting.
5. For the "wet" technique, I showed students what happened if they painted their fields with a color, and then added small dots or lines on top. Fuzzy shapes would appear, which could be plants of any nature. Lastly some green landscaping was added on the horizon, along with a blue sky. And a new discovery, the pencil lines erase easily when the paper is dry, which makes for a much nicer looking painting when complete. I was so happy with the overall results, I'm putting this project in my keeper file.
Read more »

Friday, April 16, 2010

Ceramic Fish

This fish could be made with many different types of clay. I am partial to ceramics and the layering of color, for obvious reasons, I think.
1. The students will need a stylus or wooden tool, a cup of water, and a lump of clay about the size of their fist. To begin, they should just hold and squeeze the clay and maybe spread a little water on it with their fingers to soften it up.
2. Next, they should try to roll the lump into a smooth ball. They are to keep rubbing water on it if they see cracks. The ball then needs to be flattened into a circle. It should be about the thickness of a pancake and easy to bend.
3. The pancake then is almost folded in half with just the edges pinched together on one side. There should be an opening left on the opposite side which will turn into the mouth.
4. With the pinched seam on the top, the back end is flattened and cut into a tail shape with a tool.
5. Lastly, eyes and teeth may be added to the face. Just be sure to have the students score any surfaces that they are connecting. In other words, they need to scratch the surface to make sure details stick together. Clay will shrink a bit when it dries so smooth edges tend to come apart.
6. After drying and bisque firing, this fish was painted with two different layers and colors of glaze.
Read more »

Pipe Cleaner Dolls

This doll-making project can be a good introduction to hand sewing.
1. The head is made from a 1" diam. wood ball that has a center hole. Fold a large pipe cleaner in half and insert through ball so that loop sticks out of one end.
2. Gather a small bunch of doll hair and stick it through the loop so that it is centered on the head. Pull the pipe cleaner down so that the hair is pulled snugly to the ball.
3. Twist the pipe cleaner together so that it becomes the spine of the doll. Fold another pipe cleaner in half, twist to make it strong, and wrap it around the spine to make the arms. Fold one last pipe cleaner in half, twist, and wrap to the bottom of the spine to make the legs. Embroidery floss is wrapped around the legs and arms to secure the folds and add color.
4. Give students lots of felt, heavy sewing thread and a needle and let them design an outfit for their doll.
5. Permanent markers may be used to draw facial features.

Read more »

Thursday, April 15, 2010

Paper Weaving

I find that paper is a good way to introduce kids to weaving as the patterns are more visible than with yarn. And I keep running across many 4th and 5th graders who have never tried any kind weaving, so I have concluded that this media gets overlooked way too often.
1. I did myself one favor and bought some good construction paper from Staples that was much brighter than the public school brand. One large 9" x 12" sheet needs to be chosen for the background “warp”, the term for the parallel lines in a weaving. Parallel lines need to be cut 3/4" apart from each other, leaving the top and bottom edge intact. This is most easily done with an xacto knife and ruler.
2. I cut varied widths of 9" strips of paper for the “weft”, the lines that go across in a weaving. Starting at one end, a paper needs to be woven up and down from one side to the other. The next paper is woven in the same manner, just done in the opposite way as the first. Shove each strip close together as you advance and repeat until the area is filled.
3. To add an extra bit of color, the students can go back to the widest strips and add another skinny strip on top. It adds a bit more interest to the artwork.
Read more »

Wednesday, April 14, 2010

Update for Earth Day 2010 Mural

My Earth Day 2010 Mural was missing the Color Key page shown here. Sorry everyone, I'm going to fire my proofreader (me!).

If you've purchased this mural before 4/15 and would like to receive this missing page, please send you're request directly to me at kbarbro@pacbell.net .

Read more »

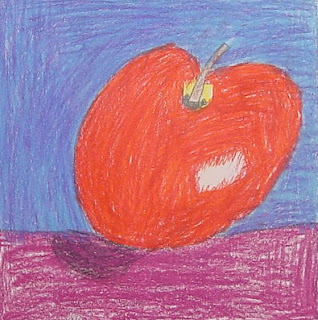
Colored Pencil Apple Drawing

Did you know that good colored pencils can actually blend together like oil pastels do? I didn’t until I purchased some new supplies.
1. Demonstrate a simple line drawing of an apple sitting on a table and ask your students to draw their own, in pencil.
2. Show students how to "glaze" a drawing by coloring the different layers needed for this apple. Fill the apple shape first with white colored pencil, then a layer of yellow (leave a highlight spot) then orange, and finally red.
3. Add detail such as the stem and background.
This apple was drawn by a second grader.
Read more »

Tuesday, April 13, 2010

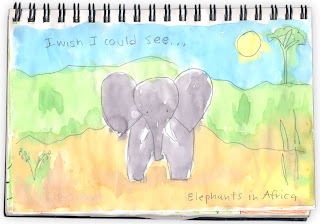
Art Journaling 127, Draw an Elephant

Sometimes when I need inspiration for my art journal class, I head to the children's section of my local library. I found "Elephant Moon" by Bijou Le Tord, and fell in love with the poetic story and simple illustrations.
1. The front view of an elephant, as shown in the book, is a nice and simple way to draw one. There are actually just three shapes to my drawing: the center head and trunk, the large symmetrical ears that extend to each side, and then the two front legs right below. I'm going to have my students follow along with me on my board, and then lastly have them add two tusks and two eyes. All are drawn in pencil, first lightly and then traced more heavily.
2. I'm going to have the students write something about elephants in their leftover space before they paint. Maybe with prompts like: "Elephants are..." and have them finish the sentence.
3. I painted my drawing with my usual dissolved Crayola watercolor tablets in a bit of water. I had a supply on hand that were all on the light side, which actually matched the art in the "Elephant Moon" book pretty well.
Read more »

Monday, April 12, 2010

How To Draw a Duck

I received a gift set of Dr. Ph. Martin’s inks and decided to show my students how to use them as a wash by adding water.
1. Using pencil on 11" x 7.5" watercolor paper, the students drew the large petal shape for the body and a circle above it for the head.
2. Curved lines were added to draw the neck.
3. The lines at each end of the neck were erased to complete the connection. Then feet, feathers and facial features were added.
4. Simple background shapes were added to create the landscape with flora. When the drawings were complete, all lines were traced with a black ink pen. Then, using small paint palettes and thin brushes, the students added water to thin the full-strength blue, brown and green Dr. Ph. Martin’s Inks and completed the picture. Of course, watercolors are an option.
Read more »

Sunday, April 11, 2010

Abstract Numbers

Charles DeMuth was an American artist who lived in the early 1900's, and became famous for his abstract paintings that used lines to fragment and divide his canvas.
1. DeMuth's "Figure 5 in Gold" is a wonderful abstract painting to show children as they can easily see the firetruck elements in it. Start by having students draw their own large block number on a piece of paper. I like to give the kids a choice of doing the 5 or another number. Single digits are best though.
2. Using a ruler, they can draw about 5-6 lines from edge to edge to dissect the paper into many sections. Encourage them to spread the lines out, and then trace all with a black marker.
3. I used Art Stix to color this piece as they are bright and not too messy, but you could use crayon or oil pastels too. Have the students choose one color for the inside of their number. In my example, I colored the inside of my 5 with orange first. When that is done, they can color in each segment with different colors, overlapping to create a new color when necessary.
Read more »

Saturday, April 10, 2010

Van Gogh Ceramic Landscape

Van Gogh was known for his thickly painted landscapes, so you can replicate the look with clay and kiln and glazes.
1. Give each student about a baseball-size piece of clay, and have them form a smooth ball. Show them how to press the ball into a thick pancake, using a roller if possible.
2. Give each student a stick or stylus, and have them etch a drawing into the clay. It's good to start with a horizon line, and then add a road, grass and sky.
3. Fire the clay plates, glaze paint, and fire again. Vibrant Van Gogh-ish colors are essential!
Read more »

Kid's Art Movie Test

Read more »

American Gothic Mural

“American Gothic” by Grant Wood is one of the world's most recognized and parodied pieces of art. My mural can be colored to match the original, or you can get creative by using the included blank faces for your own spoofing ideas.
The template consists of 36-pages and stands over 5 feet tall. This sample was colored with Porfolio® Oil Pastels. You can purchase my pdf file with instructions for just $5. Click the “Add to Cart” button below to make  payment and receive download instructions.

Add to Cart
Read more »

Thursday, April 8, 2010

Monet Pastel Iris Drawing

An on-going dilemma I face is how to help students draw new shapes, without giving them too much help. My current solution is to give them partial templates, so that they all have a good starting place to build upon. With these Monet-inspired Irises, the students were given just the center lower leaf as a template, and they had to follow my instructions to draw the rest of the flower.
1. The students used a 12" x 9" piece of paper, and a cardboard template for the lower Iris leaf, which looked a lot like an upside-down duck foot. I had them trace the petal in the center of their paper. Next, two more curved leaves were drawn to the right and left of that petal. Lastly, a center leaf is indicated with just one wavy line on top, and some small stamens were added in the center. After the flower was done, more were added to the right and left as space allowed.
2. When the drawings were complete, they were traced with a black Sharpie marker. I've learned that water-soluble markers will look OK initially, but bleed into the pastels over time. Not good if you want to keep all the nice detail your students have drawn.
3. After the drawings were complete, students were allowed to use blue or purple oil pastels to color their flowers, along with orange or yellow stamens. White pastel etched over the petals added a smudgy, Impressionist look to their art.

Read more »

Wednesday, April 7, 2010

Paul Klee Abstract Castle

Paul Klee was one of the great colorists in the history of painting. I developed this project that imitates his abstract “Castle and Sun” painting by having students trace cardboard shapes and fill them in with colored pencils.
1. Give each student a piece of black paper, a pencil and half a dozen or so cutout square, rectangle and triangle cardboard shapes. I made lots of shapes that were all based on 1" proportions. My sample uses 2" squares, 1" x 2" rectangles (some with triangle tops) 3" x 2" rectangles, a 3" bridge, and a 2" circle.
2. Starting at the bottom, the students are to stack and trace the cardboard shapes until they have built a castle to their liking. A sun is also added somewhere in the sky. After the drawing is done, they are to trace all the pencil lines with a white colored pencil.
3. All the shapes are filled in with colored pencil. Tip: If you think this may be a “keeper” project and you have the resources, buy some good black Artagain paper which won’t face before your very eyes like the school-regulated construction paper does. There’s nothing like good materials to make good art (sometimes!)
Read more »

Tuesday, April 6, 2010

Keith Haring in Chalk and Glue

Keith Haring (1958 – 1990) was an artist and social activist whose work responded to the New York City street culture of the 1980s. His simple and colorful figures are a great style to imitate when studying body proportions.
1. I gave each student a 9" x 12" sheet of black paper, and a cardboard rectangle about 3" x 5", which was centered on the paper and traced. My goal was just to have the students use this as the torso of the body, and they were to add "action" arms and legs in whatever combination they saw fit. The tendency is for them to draw small, so they need to be reminded that the middle of the torso would be the waist, so any elbows in their drawing should line up accordingly. The legs also need to be long and wide, and fill the bottom of the paper. Lastly, "energy" lines were added around the head, along with a simple horizon line.
2. After the pencil drawing was done, and the box lines were erased connecting the torso and the legs and arms, the students carefully traced the drawing with white glue. Let the art dry flat for at least 24 hours.
3. Show the students examples of Haring's simple primary colored figures. They are to use chalk pastels accordingly, coloring and blending with their fingers to get coverage all around the glue lines.

CA Visual Arts Standard: Grade Four
2.2 Use the conventions of facial and figure proportions in a figure study.
Read more »

Thursday, April 1, 2010

Aboriginal Snake Drawing

In Australia, there are Aborigines who live today as they did thousands of years ago. Like cave painters, they use art as a way to tell stories known as "dreamings." One common feature to Aborigine artwork is that the insides are filled with lots of lines and dots and patterns.
1. Start with a dark paper and pencil and have the students make a large block-style letter "S", with the ends left open.
2. Show the students how to continue the top of the "S" that goes over the body and forms a head. They same is true for the bottom to end the tail. In both cases, the snake needs to get narrower in width.
3. Lastly, they erase the lines that wouldn't show. Ask the students to trace the snake with a light color on the outside, and a light stripe down the center of the body. To finish they can divide the snake up in sections, color patterns and then also color the outside. I used a new type of pencils called Art Stix for this picture, but you could use regular colored pencils as well. Just make sure to test them first as not all colors are opaque and thus kind of disappear on the black paper.
Read more »