Total Pageviews

Tuesday, November 30, 2010

Nutcracker: Crayon with Texture Rubbing

Here is the most budget conscious version of my Nutcracker project, using just good old-fashioned crayons on white paper. I added a twist of placing a plastic needlepoint tapestry underneath when I was coloring the red suit to give my guy some extra texture.
Read more »

Giant Paper Mache Nutcracker, Part 3 and 4

Last week my giant nutcracker project was completed, just in the nick of time for the school’s holiday show. 

White paper towels were paper mached over the newsprint. The next day students painted a layer of red, black and peach acrylic paint. The face, buttons and belt were added when all was dry, and white fur beard pinned at the end (one minute before curtain, to be exact.)

The kids loved working on this project, and a smart 2nd grader already suggested how we could recycle him after the holidays – turn him into Abe Lincoln for President’s Day! Does our school have clever kids or what?
Read more »

Monday, November 29, 2010

Nutcracker: Colored Pencil on Black Paper

Here is a sample of my Nutcracker project using metallic marker and colored pencils on black construction paper. I used black construction paper from Michael’s (it’s very black) and Prang Metallic markers (about $1 each from Staples) and Dick Blick Student grade colored pencils. A bit more expensive than your average supplies, but the results are amazing.
Read more »

Sunday, November 28, 2010

Nutcracker: Watercolor Painting

I like to have students create one really special piece of art for the holidays, and I remember having good results with this nutcracker drawing last year. My only dilemma is figuring out which media to use. I have some Crayola Mixable Watercolor trays and watercolor paper, so this is a sample of how that media would look. I like the vivid red, the only catch is that a lot needs to be mixed (combining the violet and orange) and I’m not sure if I’ll get a lot of splotchy nutcrackers that way. More tests to come...
Read more »

Saturday, November 27, 2010

Nutcracker: Oil Pastel on Black Paper

 This is a breakdown of my Nutcracker drawing project, this time using oil pastels on black construction paper. I tried the steps shown in my diagram and had really good results, and lots of proud smiles to go with them.
Read more »

Friday, November 26, 2010

Homemade Christmas Card

There’s nothing like a homemade holiday card. I tried this method to make a quick “quilted” card that didn’t actually call for any sewing.
Read more »

Thursday, November 25, 2010

How to Draw Thanksgiving Pumpkins

Students can learn how to make circles look like spheres when they practice drawing pumpkins. I’ve broken my drawing into steps to show how even just lines can be used to make a flat shape look dimensional.
Read more »

Wednesday, November 24, 2010

Abstract Snowman Card

I needed a simple and quick card project, and was inspired by some stock snowman art. After deliberating on all my options, I settled on using Sharpie markers to get the brightest color for the least amount of cost.
Read more »

Tuesday, November 23, 2010

Stained Glass Hanukkah Menorah Mural

This year's Hanukkah celebration, the Festival of Lights, begins on Dec. 1st. My Hanukkah Menorah Mural consists of a 30 pages and measures 45" x 48" when complete.

You can purchase my pdf file with instructions for just $5. Click the “Add to Cart” button below to make your payment and receive your download instructions.

Add to Cart
Read more »

Wednesday, November 17, 2010

Turkeys from Brentwood, CA

Volunteer art docent Tricia, from Brentwood, CA sent these beautiful turkeys painted by 4th graders. Based on my "One More Turkey Drawing" project, she had the students draw them on 12x18 white paper with Sharpies. They added oil pastel accents and finished with water color from edge to edge. Absolutely beautiful use of color! Thanks so much for sharing them, Tricia.
Read more »

Tuesday, November 16, 2010

Turkey “Hand” Print

The idea of turning a hand into a turkey has been around for awhile. Here’s a twist using a craft foam hand and acrylic paint to make a simple and easy monoprint.
Prep: Craft foam hands are sold in lots of craft stores. Glue each with craft glue onto a large (10" x 13"ish) piece of corrugated cardboard. Let dry overnight.
1. The students each get their own cardboard with hand, flat paint brush, and several pieces of letter size paper. With my young students, I opted to walk around and squirt a bit of brown acrylic paint on each board. The students used their brush to spread the paint around and spread out any puddles. They placed a piece of paper on top, rubbed it with their hand, and lifted to make a print. They were able to make several prints to get one that they really liked (clean shape with minimal splotches).
2. After the prints were dry, each student used a black Sharpie to draw just a few details on their turkey. Shapes were colored in with pencil crayon when finished.
Read more »

Monday, November 15, 2010

Burlap Weaving Bookmarks

Weaving lessons can come in many forms, the simplest being with just plain paper. My preference though is using actual fabric, and burlap has the most open and visible weave for beginners to work with.
1. Give each student a rectangle of burlap, about 3" wide by 9" tall. They are to pull about 5 threads from all four sides, one a a time, to make a decorative fringe.
2. To make some room to add new yarn, about 3 consecutive horizontal threads are pulled out.
3. The students thread a tapestry needle with some colorful new yarn, and run it through the new open row in the burlap, weaving up and down as often as they could, the ideal being over or under every thread. The yarn is pulled through and the ends trimmed when finished.
4. This process was repeated as often as possible until the end of class. I had a 2nd grader that did 13 rows!
UPDATE: I wanted to add that this has been one of my most successful projects to date. About 300 second through fifth graders completed their weavings last week, and not one of them went away feeling frustrated or deciding that weaving or sewing (as some called it) was not for them. Teachers loved it too, asking for more when school gets back in session. After the investment of the tapestry needles (metal are best), the cost is about $7 for a class of 24.
Read more »

Sunday, November 14, 2010

“The First Thanksgiving” by J. L. G. Ferris

In 1621, the Plymouth colonists and Wampanoag Indians shared an autumn harvest feast, which is acknowledged today as one of the first Thanksgiving celebrations in the colonies. Jean Leon Gerome Ferris (1863–1930) an American painter best known for his scenes from American history, made a painting commemorating this event titled “The First Thanksgiving”.
My pdf file is made up of a 30 pages and measures 60" x 40" when complete.

You can purchase my pdf file with instructions for just $5. Click the “Add to Cart” button below to make your payment and receive your download instructions.

Add to Cart
Read more »

Friday, November 12, 2010

How to Draw a Turkey

I found this turkey shape in a stock art illustration, and I think it works well for a basic turkey drawing lesson. It also uses radial symmetry, which is one of the Arts Standards for the 2nd grade.
1. I plan to have the students follow along with my drawings steps as shown in my diagram. The most important thing is that they draw large and fill up the paper they are given.
2. After the pencil drawing is complete, they will trace all their lines with a black Sharpie. I like the variety of using some thick and some with fine points.
3. This turkey is actually painted in with instant coffee and then sprinkled with salt before it dries. The salt soaks up bits of the water and leaves a cool textured look behind. A bit of red orange paint completes the picture.
4. When the coffee is completely dry, brush off the crystals to reveal the texture pattern behind.

CA Visual Arts Standard: Grade Two
2.5 Use bilateral or radial symmetry to create visual balance.
Read more »

Thursday, November 11, 2010

Tissue Paper + Watercolor Fall Leaves

These are cut out tissue paper leaves outlined with a gold marker, and enhanced with just a bit of watercolor paint. Can you tell I just can’t get enough of fall art projects?
1. I used my “How to Draw a Maple Leaf” post to create a paper template, and traced it on the tissue paper (mine was an American Greetings® brand from the drug store). I found it helped to cut out several layers at a time. I cut out various sizes and other simple shapes of leaves to make my collage more interesting.
2. Using a glue stick, I covered large sections of white card stock paper, and layered the leaves on top. I used a purple glue stick and found that any extra glue did dry clear and smooth so don’t worry about using too much glue.
3. I took a gold Sharpie Poster Paint marker and traced around each leaf, and added some veins inside as well. Loose tracing is OK as it adds a casual look to the art.
4. My new favorite watercolor paint is Crayola’s Watercolor Mixing Set. It has a very pretty cyan and magenta color, along with a darker navy. I used a generous amount of cyan paint to fill in the background, and then just a small, watery amount to add more color inside the leaves.
Read more »

Wednesday, November 10, 2010

Watercolor Resist Tree Collage

I learned an interesting paper lesson today. I always thought that only REAL watercolor paper could bring about bright and colorful watercolor painting. My 5th graders just finished an eye-popping collection of fall tree collages, all using regular white card stock paper (for the leaves). The difference was using good liquid watercolor paints, not my usual homemade variety. Good scrapbook paper for the background was also key. Standard issue construction paper just doesn’t have the visual punch.
SESSION ONE: The students started with a letter-size 65 lb. white card stock paper, and placed it over a sheet of plastic needlepoint mesh. They shaded the entire paper with about 3 or four different crayon colors. The students painted over the entire paper with slightly watered-down Dick Blick liquid watercolor paints and let it dry.
SESSION TWO: My scrapbook collection of paper had a variety of blues and greens. After choosing a background blue paper, the students were to cut a wavy strip of green for their grass, and several tree trunks out of black paper. All were glued down in place with a glue stick. After the trees were complete, scraps of the watercolor paper were used to cut and glue small “leaves” that were falling down.
Read more »

Tuesday, November 9, 2010

Paper Mache Pumpkins from Barcelona

One of my favorite blog finds has been “Fem Manuals” from Barcelona, Spain. This teacher always seems to have amazing and unique projects. So, imagine my surprise when she contacted me about her latest post – one inspired by my paper mache pumpkin project! I just can't get over how well her kids made these, and what gorgeous colors they used. I think it’s the perfect blend of nature and art. Thank you so much for sharing these Cristina.
Read more »

Monday, November 8, 2010

Warhol Hand Prints

I’ve started a new afterschool print class, and this Warhol hand print turned out pretty well, for even my young kinders. The watercolor background (quick drying time) allowed for the project to be done in one class.
1. I had pre-drawn the grid on the 11" x 15" watercolor paper, but the students had to trace it heavily with a dark crayon. Afterwards, they painted each rectangle a different color. I had them use my liquid watercolors in spill-proof cups to speed up the process.
2. The watercolor sheets were taken away to dry and the students practiced making leaf prints with white acrylic paint on black paper. It was quite messy, as I knew it would be, but they did all have a lot of fun.
3. After about 20 minutes of leaf printing, I set up a station with one plate of black acrylic paint and one with white. I wiped any excess paint off the hands, and the students made hand prints on the watercolor paper. The hands were flipped for the bottom row to make a checker pattern.
Read more »

Sunday, November 7, 2010

Recycled Turkey on a Stick

This ingenious idea for making turkeys from old food boxes comes from My Plum Pudding. It’s a really great use of those colorful coated boxes that I can never seen to throw away.
This turkey is made entirely from cut up boxes that are attached to a 1/4" wooden dowel. They’re cheap, about 20¢ each at Michael’s. This bird may look fairly simple, but I learned that the proportion of all the circles were important so I made a visual diagram for those interested in making their own. Click here to view the jpeg file. Have fun!
Read more »

Saturday, November 6, 2010

Kinder Watercolor Resist Snowman

This is another kinder art + book match that I feel is about as good as you can get. “The Biggest, Best Snowman” by Margery Cuyler not only tells a great story about friends, it involves the actual creation of a snowman. This is helpful to little ones that may have yet to build one of their own.
1. Each student started with a 9" x 12" sheet of watercolor paper and pencil. I gave my students a roll of masking tape to trace (the inside) to establish the bottom circle. The middle and top circle were drawn freehand by the students. The arms, face, hat, scarf and ground line were added.
2. After the snowman was finished in pencil, he (or she) was traced with a dark crayon. Any small shapes like the hat and scarf were colored in with crayon.
3. Using a white crayon, I asked the students to draw lots of snowflakes around their snowman, either as crisscross stars or small circles. Whichever shape they chose, they just needed to use lots of pressure to make sure thick white lines were created.
4. I had recently gotten hold of some blue Dick Blick Liquid Watercolor Paint, and I watered it down a bit (maybe 30%) before letting students paint over their sky. I love the shade of this blue, but I’m sure others would look fine too.
Note: I used this project for my school’s artwork fundraiser with originalworks.com and so far have some very happy parents to show for it. I have to keep reminding myself that sometimes the simplest projects create the best results.
Read more »

Friday, November 5, 2010

Layered Fall Leaves

You can show students how to overlap leaves and blend colors with oil pastels, and have very lovely picture as the result.
1. I tend to think of the maple leaf as the classic fall shape, and made templates out of chip board with the stem left off. Give each student one leaf and ask them to trace at least two leaves that overlap. Ask the students to choose which leaf is on top, and explain that all the lines inside that leaf must be erased. They can then add some leaves going off the page, and some veins as well.
2. All of the pencil lines are to be traced with a thin black marker.
3. Ask the students to use at least two oil pastel colors in each leaf, overlapping as they go along. Oil pastels are the best for blending colors together, so the goal is to not have any "hard" edges between the colors.
4. Lastly, the background needs to be colored in with a contrasting color.
Read more »

Wednesday, November 3, 2010

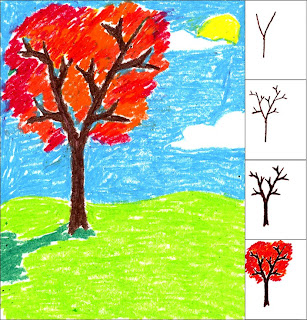
How To Draw a Fall Tree

I found this project on Artsonia.com, and I love how it makes students think of trees as a series of branches, and not just a fluffy shape that sits on a stick (not a bad place to start, but can be left behind at some point).
1. Ask the students to draw a large "Y" on their paper.
2. Show them how to add smaller "Y"s on each side, alternating as they go up each branch. To make the "Y"s the most realistic, they should be directed toward the sky somewhat, and not at 90 degree angles.
3. When the lines are complete, they need to be thickened. The fattest part of the trunk should be at the bottom, and all the lines should gradually get thinner until they end in points at the top.
4. Lots of fall colors can be colored around the branches. I used my favorite Portfolio oil pastels here.
5. The background may be added, with grass and shadow and sun and clouds.
Read more »

Tuesday, November 2, 2010

Turkey Pinch Pot

I found this pinch pot in Arts & Activities magazine and it's a great project for 1st graders on up.
1. Give each student a lump of modeling clay about the size of a small apple. Point out that softening the clay is an important first step and this is done by wetting the clay and squeezing it until it becomes warm. They then roll it into a smooth ball.
2. To form the pinch pot, the students press their thumb into the middle of the ball and pinch the sides until a bowl is formed with sides about the thickness of a pancake.
3. The students then pinch together one side of the bowl to form the turkey head. On the opposite side, the clay is pinched flat and curved to form the tail. When the shape is complete, feathers are etched into the sides.
4. Fire the clay, paint with glaze, and fire again. A very cute addition to your Thanksgiving table!
Read more »

Creativity for Kids Giveaway

And the Creativity for Kids Giveaway winners are. . .

Briana who wrote...
My little girls would love either one of these!

and katiebird who wrote ...
My little girl would love either of these! What a neat opportunity. Thanks!

Congratulations winners, I have your email addresses and will be contacting you shortly.
Thanks again to Creativity for Kids for sponsoring this generous giveaway.


ABOUT CREATE YOUR OWN ENCHANTED STORYBOOK
This adorable castle-shaped book comes ready to decorate with markers, glitter stickers, color-in-stickers and rhinestones. Write your story on the lined pages then use the blank pages for your illustrations. Open the drawbridge door and personalize the story with your name. You can add your picture to the tower window too!
Age Range: 5 – 95
$17.99

ABOUT DIVA PUPPIES
Pamper 3 pooches with paint, sequins, flowers, ribbons, heart charm collars, fur, boas and tutus. Time for a nap? Each puppy has a soft furry bed to curl up on. Each bobble-head pup measures 5" x 2 1/2" x 2 1/2", all packaged in an adorable doghouse style box.
Age Range : 9 – 99
$17.99
Read more »

Monday, November 1, 2010

Fall Watercolor Tree Collage

This was recently a very successful project for 3rd to 5th graders. I like the contrast of the soft watercolor against the crisp cut leaf edges.
Week 1. Give the students two 9" x 12" sheets of paper and watercolor paints. Instruct them to paint one sheet with a green grass base and blue sky. Dabbing the wet sky with a dry paper towel can create a soft cloud effect. The remaining sheet is to be completely painted in splotches of warm colors - red, orange and yellow.
Week 2. Give the students a rectangle of black construction paper to cut out a tree trunk silhouette with branches on top and roots on the bottom. This gets glued to the blue and green (sky/grass) paper. The remaining splotchy paper gets cut into small triangle shapes and glued to the tree, sky and ground.

Read more »