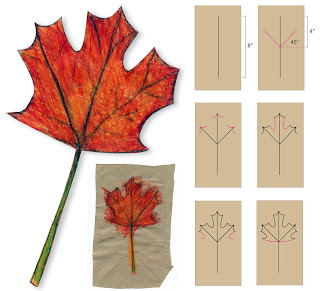
 I love all things relating to the fall season, especially the wonderful shape and color of the classic fall maple leaf. It’s shape can look a bit complex until you break it down into steps. I made my leaf with grocery bag paper to give it a natural look and feel. Another lovely way to recycle.
1. Give each student approximately half of the seamless side of an average grocery bag to make a piece that measures about 7" x 11". Using rulers, they are to center an 8" vertical line.
2. Measure 4" from either end to find the center, and make a dot from which two “stems” are added at approximately 45 degree angles.
3. Small scallops are drawn at the tip of each line. They should all be the same size.
4. The 2 large“J” shapes connect the scallops. This shape should extend about half way down to the center point.
5. Two more “J” shapes are added with the ends of both just about level with the center point.
6. Gentle curved lines connect the outer points to the center point.
7. Add a second line to widen the stem so that it can be colored in. Small vein lines can be added, all to be traced heavily in pencil. Use colored pencils to fill in the leaf. Layer lots of fall colors and press hard to make a rich looking leaf.
8. Cut out carefully and display as desired.


 9:45 PM
 keprok


0 comments:
Post a Comment